AI Diagnosis in a Job
When a job is created with fault codes, symptoms, a scan PDF or a customer's symptom answers, MechIQ builds an AI diagnosis for it in the background. On the job you meet it in three places: the MechIQ Briefing on the Briefing tab, and on the Work tab the Guided diagnosis loop and the Workflow card with its findings and tasks.
This is different from the standalone Diagnostics page. In-job diagnosis is tied to the vehicle, the customer and the repair, and your verdicts are recorded against the job.
What your verdicts actually teach MechIQ: when a component is marked not needed or not found twice or more at your garage, the AI is told to be conservative about suggesting it again and to need clear evidence for the specific vehicle. That learning is per-garage and per-component -- it is not shared with other garages, and it is not keyed to the model of car.
Need to ask the AI something while you work? Note → Hold to Ask AI in a browser, + → Ask MechIQ on the native app. See Ask AI.
The MechIQ Briefing
The Briefing tab carries the AI's summary of the job -- what it thinks is going on and how to approach it. It is built once, at check-in or after the VHC, from the fault codes, symptoms, customer answers, vehicle history and mileage. Refresh rebuilds it from the job as it stands now (latest VHC, your notes, your verdicts) and replaces the old one -- there is no history. See Job Card.
When you Run Diagnosis on the job, the briefing keeps its words and gains a line for the run: what you entered and what it found -- for example Diagnosis from fault codes P0171: Lean mixture on bank 1…. That line stays when the briefing is refreshed or rewritten later, so the code is always on the job.
Guided diagnosis -- the test queue
On a Diagnostic job the Work tab opens with a Guided diagnosis card. Tap Start guided diagnosis and MechIQ proposes a first round of tests.
- Each test has a name and an instruction. Do it and record the result -- Pass, Fail or Unclear -- with an optional reading in the Result / reading box.
- Once at least one result is in, tap Get next steps. MechIQ takes everything so far and either proposes the next tests (Guided diagnosis · round 2, with its reasoning) or confirms the fault.
- At Fault confirmed you see the fault and the recommended repair. Tap Build work plan from this and the normal labour-and-parts plan is generated for the desk to price.
The queue never guesses a fault without evidence from your tests. It takes you from symptom to confirmed cause one discriminating test at a time.
The Workflow card
The Workflow holds the AI's findings and the task groups in one ordered list, worked in Guided view one at a time or scanned in All view. Tasks are covered in Task Checklist; this section is about findings.
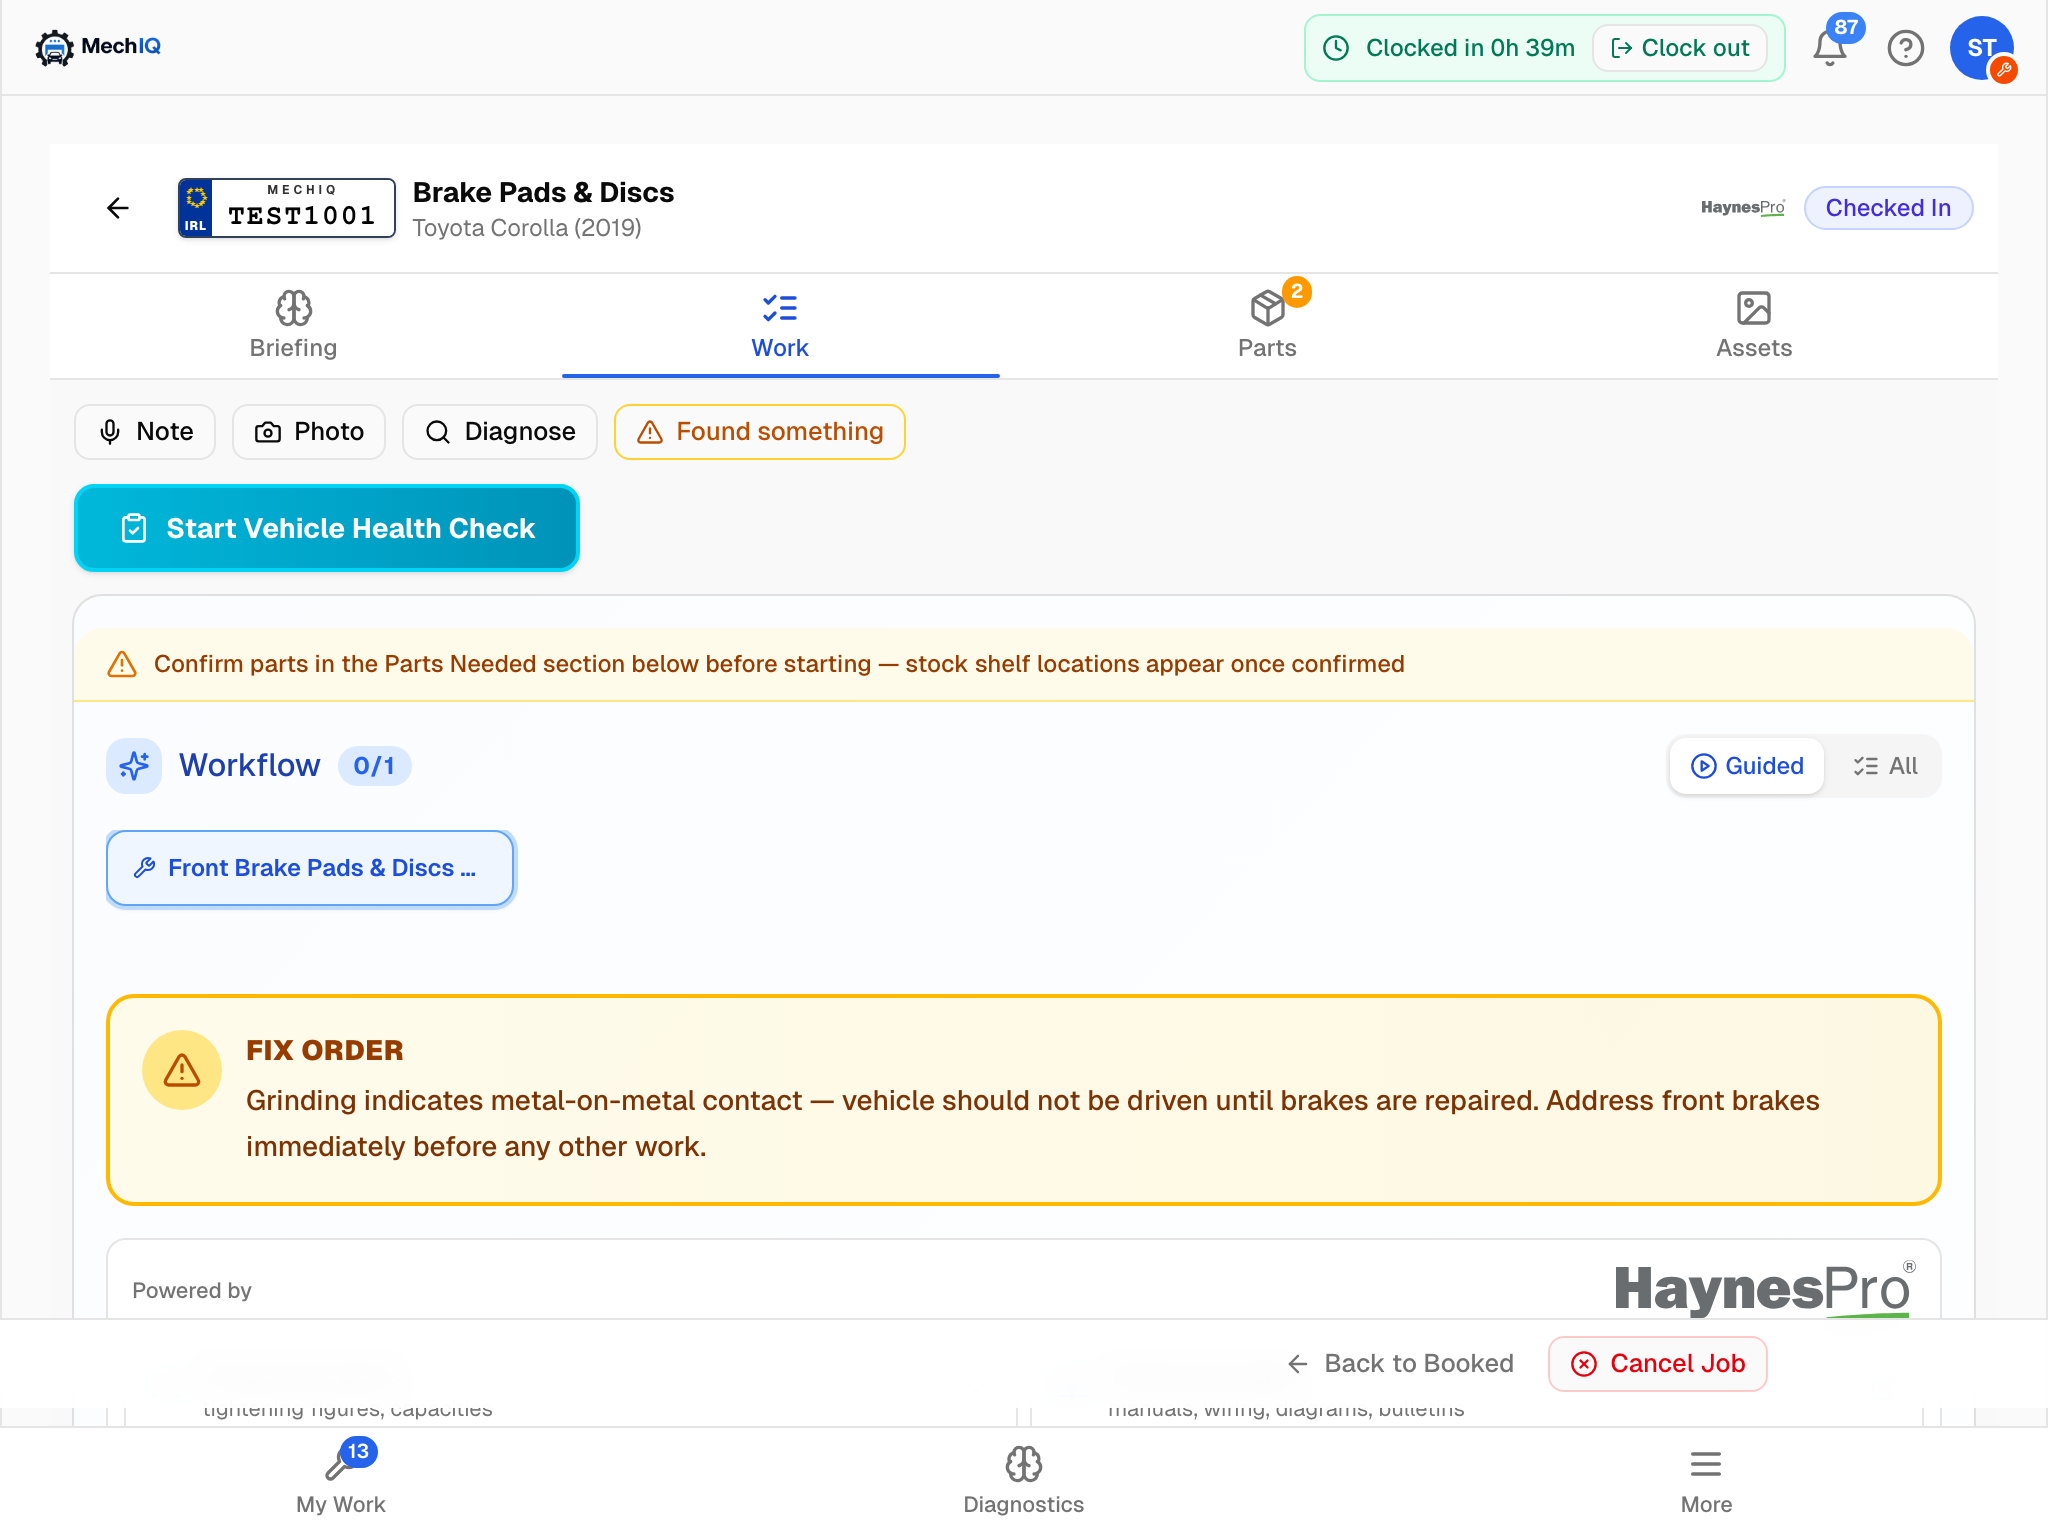 A repair job's Workflow. Fix Order says what to do first; the HaynesPro card underneath opens torque figures and the technical data browser.
At the top of the card:
- Fix Order -- the AI's note on which issue to address first. Fixing the root cause often clears the related codes.
- N manufacturer recalls on record -- a red line, also at the top of Briefing, when HaynesPro has open recalls for this model. View opens the list in Technical data. Confirm the recall applies to this VIN and whether it has been actioned.
- Powered by HaynesPro -- Torque & specs expands the manufacturer's tightening figures and capacities inline; Technical data opens the full browser. See Technical Data.
- Help MechIQ refine this -- tap-to-answer chips for the one or two things the AI was unsure about (Which axle is the caliper on? Front / Rear). The diagnosis is already usable; answering only refines the affected finding.
A finding in Guided view
Each finding shows its component, a severity badge, the estimated hours, a description, the Recommended Action, and -- where the AI has one -- a Step-by-Step Guide with numbered steps you can tick as you go (some carry an italic note on where the component sits). Fixing this may also resolve: … lists the findings linked to it.
Severity:
- Critical (red) -- must be fixed; safety, or will cause further damage.
- Warning (amber) -- should be fixed; will worsen.
- Advisory (blue) -- monitor.
Close each finding with a verdict:
- Done -- you did the work or confirmed the AI was right. Recorded as Issue Found.
- Not Done -- you are moving past it. Recorded as Skipped.
- Issue Resolved -- No Further Action Needed -- the fault is sorted and nothing else on the list needs checking. Confirms this finding, marks the rest as skipped, and strips the unused estimated labour and parts from the quote.
A finding that came from the VHC reads Complete (Work done) and Not Doing (Customer declined) instead, because that is what the choice means for an inspection item.
Your verdicts move the N/M counter in the card header. On the native app the same findings are on the Briefing tab with Confirmed, Not found and Defer buttons: mark what you actually found -- this trains MechIQ.
Cascade and retest
Marking a root cause Done automatically marks its linked findings Likely Resolved (cascade fix) and shows Retest Required: after the repair, clear the codes and re-scan to verify the related codes have cleared. Tap Got it -- continue. If any codes return, they need separate attention.
Voice feedback for the AI
After a verdict on an AI finding in a browser, Hold to Give AI Feedback appears (not on VHC findings or cascade-resolved ones). Hold it and say what you actually found -- it was the intake gasket, not the sensor.
What it does today: the words are transcribed and saved on the job as a note, marked as AI feedback. The desk and QC read it, it stands as the record of what the fault really was, and it sits in the job's notes for any later diagnosis on that job to work from. It does not train anything beyond this job -- the per-garage, per-component learning above comes from your verdicts, not from this note. Say it anyway: it is the clearest account anyone gets of what the car actually needed.
Running a further diagnosis
Diagnose in the quick-action row opens Run a diagnosis -- the MechIQ Diagnostic Engine:
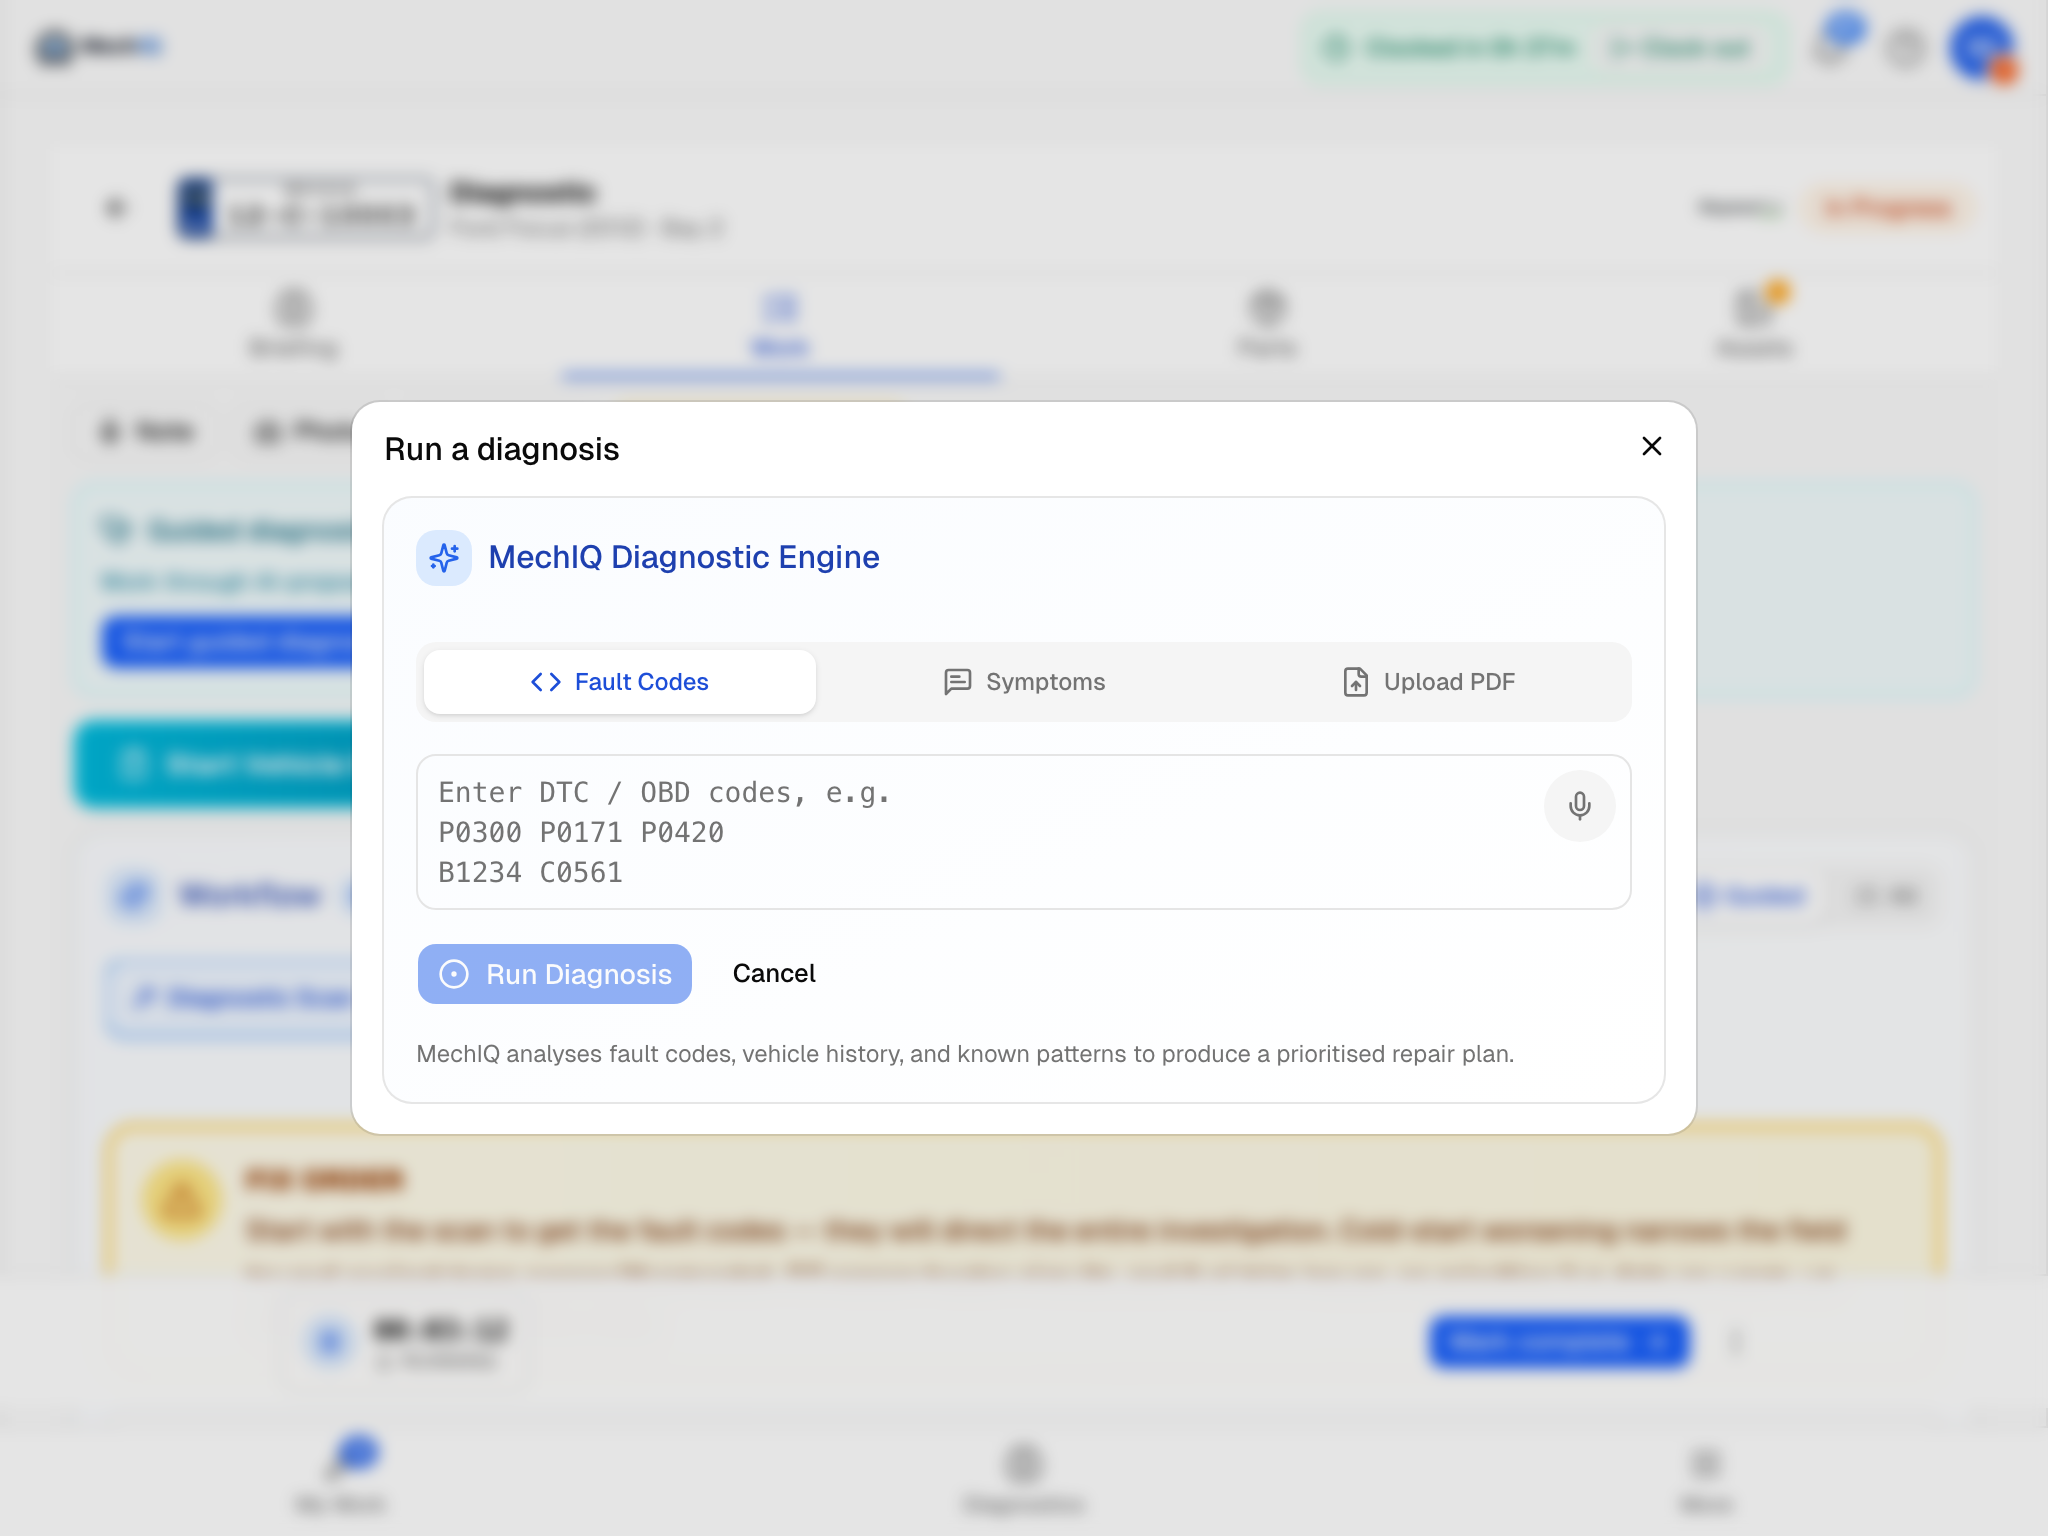 Run a diagnosis. Fault codes, a symptom description or a scan PDF; the result rebuilds the job's findings and plan.
- Fault Codes -- OBD or manufacturer codes, several at once (P0300 P0171 P0420).
- Symptoms -- what you observed, in plain words. The microphone dictates.
- Upload PDF -- drop a scan report from your diagnostic tool (up to 20 MB). Text is extracted and the briefing regenerates in the background.
Tap Run Diagnosis. MechIQ shows MechIQ'ing… with what you entered. A full diagnosis can take up to 3 minutes. It runs on the server, so you can close the dialog and carry on: the answer is saved to the job. While it runs, the quick-action row shows Diagnosing… (started hh:mm) in place of Diagnose, also after a reload. The dialog opens on the answer once, when it arrives on your screen; after that the result lives on the job (the briefing's Diagnosis from … line), not as a pop-up.
A repair the diagnosis finds is found work, the same as when you tap Found something: it goes onto the job's Extra work for the desk to price and send to the customer. It is not added to the bill, and its tasks do not reach your plan until the customer approves it. The investigation steps join your plan with no charge of their own -- the booked diagnosis is the assessment. If the input was too ambiguous to plan, you get One quick question -- tap an option or type an answer and it re-runs once with that. If the run fails, the dialog says why, nothing on the job is changed, and Try again runs the same input again.
The button is offered while the job is checked in or in progress and nothing is already generating. A started job with no work plan shows No work plan yet with Make a plan (from the job's description) and Diagnose. On the native app it is + → Diagnose, which also takes photos and a clip -- see Snap for AI.
When the diagnostic-phase tasks are all ticked (a Diagnostic Scan group, say) the Run a diagnosis dialog opens by itself so you can enter what you found.
Bulletins under the Workflow
Below the card, for reference rather than in your way:
- N technical service bulletins for this model -- HaynesPro's TSBs, collapsed behind that one-line bar by default; tap it to list them, then Read the bulletins for the text. Bulletins for the other drive side are listed last, greyed and badged LHD only / RHD only, not hidden.
- DDTSB bulletins -- hotline fixes from Elektro Partner's DDTSB service. If your garage subscribes, the card shows the count for this car by group (critical, model-specific, general), the first headlines, and Open in DDTSB. If it does not, the card says how many bulletins DDTSB has for the car and offers Ask the office about this -- one tap tells the garage admin (once for the whole garage); you cannot sign up from the floor. If nothing is licensed the card does not show at all.
Finishing up
When every finding and task is closed the card shows All tasks complete: say how the diagnosis landed (Issue resolved -- fault codes cleared and verified or Issue not resolved -- requires further investigation), tick the two finish-up checks, and Complete Job. If the plan was only diagnostic steps you get Report your findings above to generate next steps instead. See QC Handover.
Tips
- Work Guided in order -- the most likely root cause is first.
- Close every finding with a verdict -- the verdicts are what make the AI less likely to over-reach on your cars. Add the voice feedback when the AI got it wrong: it is the record of what the fault really was.
- No diagnosis card at all? The job was created without codes or symptoms. Run one with Diagnose, or ask the desk to add them.
- The estimated hours on a finding are AI estimates for the desk's quote, not a target.