Importing from Garage Hive
Exporting your files
This guide walks you through getting a full data set out of Garage Hive by hand — customers, vehicles, and the complete vehicle service history (jobs plus the parts and labour on each). Garage Hive runs on Microsoft Dynamics 365 Business Central, so every step is the standard "open the list → Open in Excel" flow.
What about connecting directly? MechIQ can talk to Business Central over its API, but the sign-in needs a one-time Microsoft admin consent that most garage tenants block, so the direct connector is switched off. The file export below is the supported route, and it brings across the same data.
Screenshots are from a live Garage Hive tenant with customer details blurred. Note that customer numbers stay visible — MechIQ uses them to link records together.
What you'll export
The basic migration needs one change: add the address columns to Customers (Garage Hive's standard Customers list has no address — see 1. Customers below). Every other list goes as it comes: open it, click Open in Excel, save the file. Six files bring across customers, vehicles and the complete service history; four more are optional. The spreadsheet file names don't matter — MechIQ identifies each file by its contents, so you can drop them all in at once.
Is there an "export everything" option? No. Garage Hive runs on Business Central, and Open in Excel exports exactly the columns showing on the list page. That is fine: the six basic lists carry what MechIQ needs as they come, and MechIQ ignores any column it doesn't use, so extra columns never hurt.
| # | Garage Hive list | Becomes in MechIQ |
|---|---|---|
| 1 | Customers — add Address, Address 2, City, Post Code first |
Customers, with their addresses |
| 2 | Vehicle List | Vehicles (linked to their owner automatically — see below) |
| 3 | Posted Jobsheets | Job history (the visits) |
| 4 | Posted Sales Invoices | Invoice history |
| 5 | Posted Sales Invoice Lines | What was done (parts + labour) — builds the vehicle history |
| 6 | Customer Ledger Entries | Open balances, credit customers hold on account + exact invoice dates (filter Open = Yes, or export as-is) |
| 7 | Jobsheets (the open list) (optional) | Future bookings (on the calendar) |
| 8 | Vendors (optional, recommended with parts) | Suppliers — the Vendor No. column (in the export by default) is what links the vendor codes on your parts (EURO, FIN001, …) to real supplier names, so parts arrive saying "Euro Car Parts" instead of a ledger code |
| 9 | Items (optional, recommended) | Your parts catalogue with real costs — tyre sizes in it price online tyre bookings automatically |
| 10 | Chart of Accounts (optional, recommended if you use Sage/Xero/QBO) | Your own account codes, so exports to your accounts package carry the codes your accountant already uses instead of our standard defaults. Make sure the External System No. column is included — that's the nominal code your accounts package knows (Garage Hive's own No. is internal) |
Why so little to add? Apart from the address, MechIQ works out the links for you:
- Vehicle owners — it reads each vehicle's job history to find its owner, so you don't need to add
Customer No.to the Vehicle List. - Invoice dates — it takes the exact posting date from the Customer Ledger Entries file (the 6th file above), so you don't need to add
Posting Dateto the invoices list.
That's the whole basic migration — the address columns on Customers, the first six lists, Open in Excel, drop them in.
Optional extras — decide before you import
None of these are needed. Each one adds a column to a list before you export it (see Adding a column below), and each brings one more thing across. Best decided now: an import never overwrites a customer, vehicle or supplier that already exists in MechIQ (that protection is what lets you re-run an import safely — nothing gets duplicated). If you do add a column later, export the list again and import it with Fill in missing details ticked — see Already imported? Fill in the blanks below.
| Add this column | To this list | What it gives you |
|---|---|---|
Payment Terms Code |
Customers | Trade/account customers arrive with their real terms (30D, COD, 30DEOM, …) instead of the default net-30 |
Payment Terms Code |
Vendors | Suppliers arrive on their real terms too, so a COD supplier isn't treated as net-30 credit |
Marketing Channel |
Customers | How each customer found you — their acquisition source for reporting |
Customer No. |
Vehicle List | Vehicles that have never had a job here go to their real owner. Those have no history to link them by, so without this they go to Unassigned vehicles (imported) for you to move |
MOT Due Date |
Vehicle List | Irish garages' NCT dates land on the right field, so reminders work from day one |
| (a whole extra list) Purchase Lines | — | Your suppliers' real part numbers and unit costs become supplier price-list entries (used when sourcing parts); repeated parts keep the latest price. Import it together with the Vendors file |
External System No. |
Customers and Vendors | Each customer and supplier exports under the account reference your accounts package (Sage) already uses — no matching needed. Open in Excel leaves this field out, so it comes from a Configuration Package instead — see External System No. — your accounts package's references below |
After adding a column, refresh the page (F5) before Open in Excel — the export uses a cached view and will leave the new column out otherwise.
Add Payment Terms Code to the Vendors list and supplier terms come across with them -- 30D, COD and 30DEOM all land correctly, so a COD supplier is treated as COD rather than quietly becoming net-30. Without that column, imported suppliers arrive with no terms and you set them per supplier under Inventory & Suppliers.
Finding your way around Garage Hive
When you log in you land on the Service role centre — your home screen.
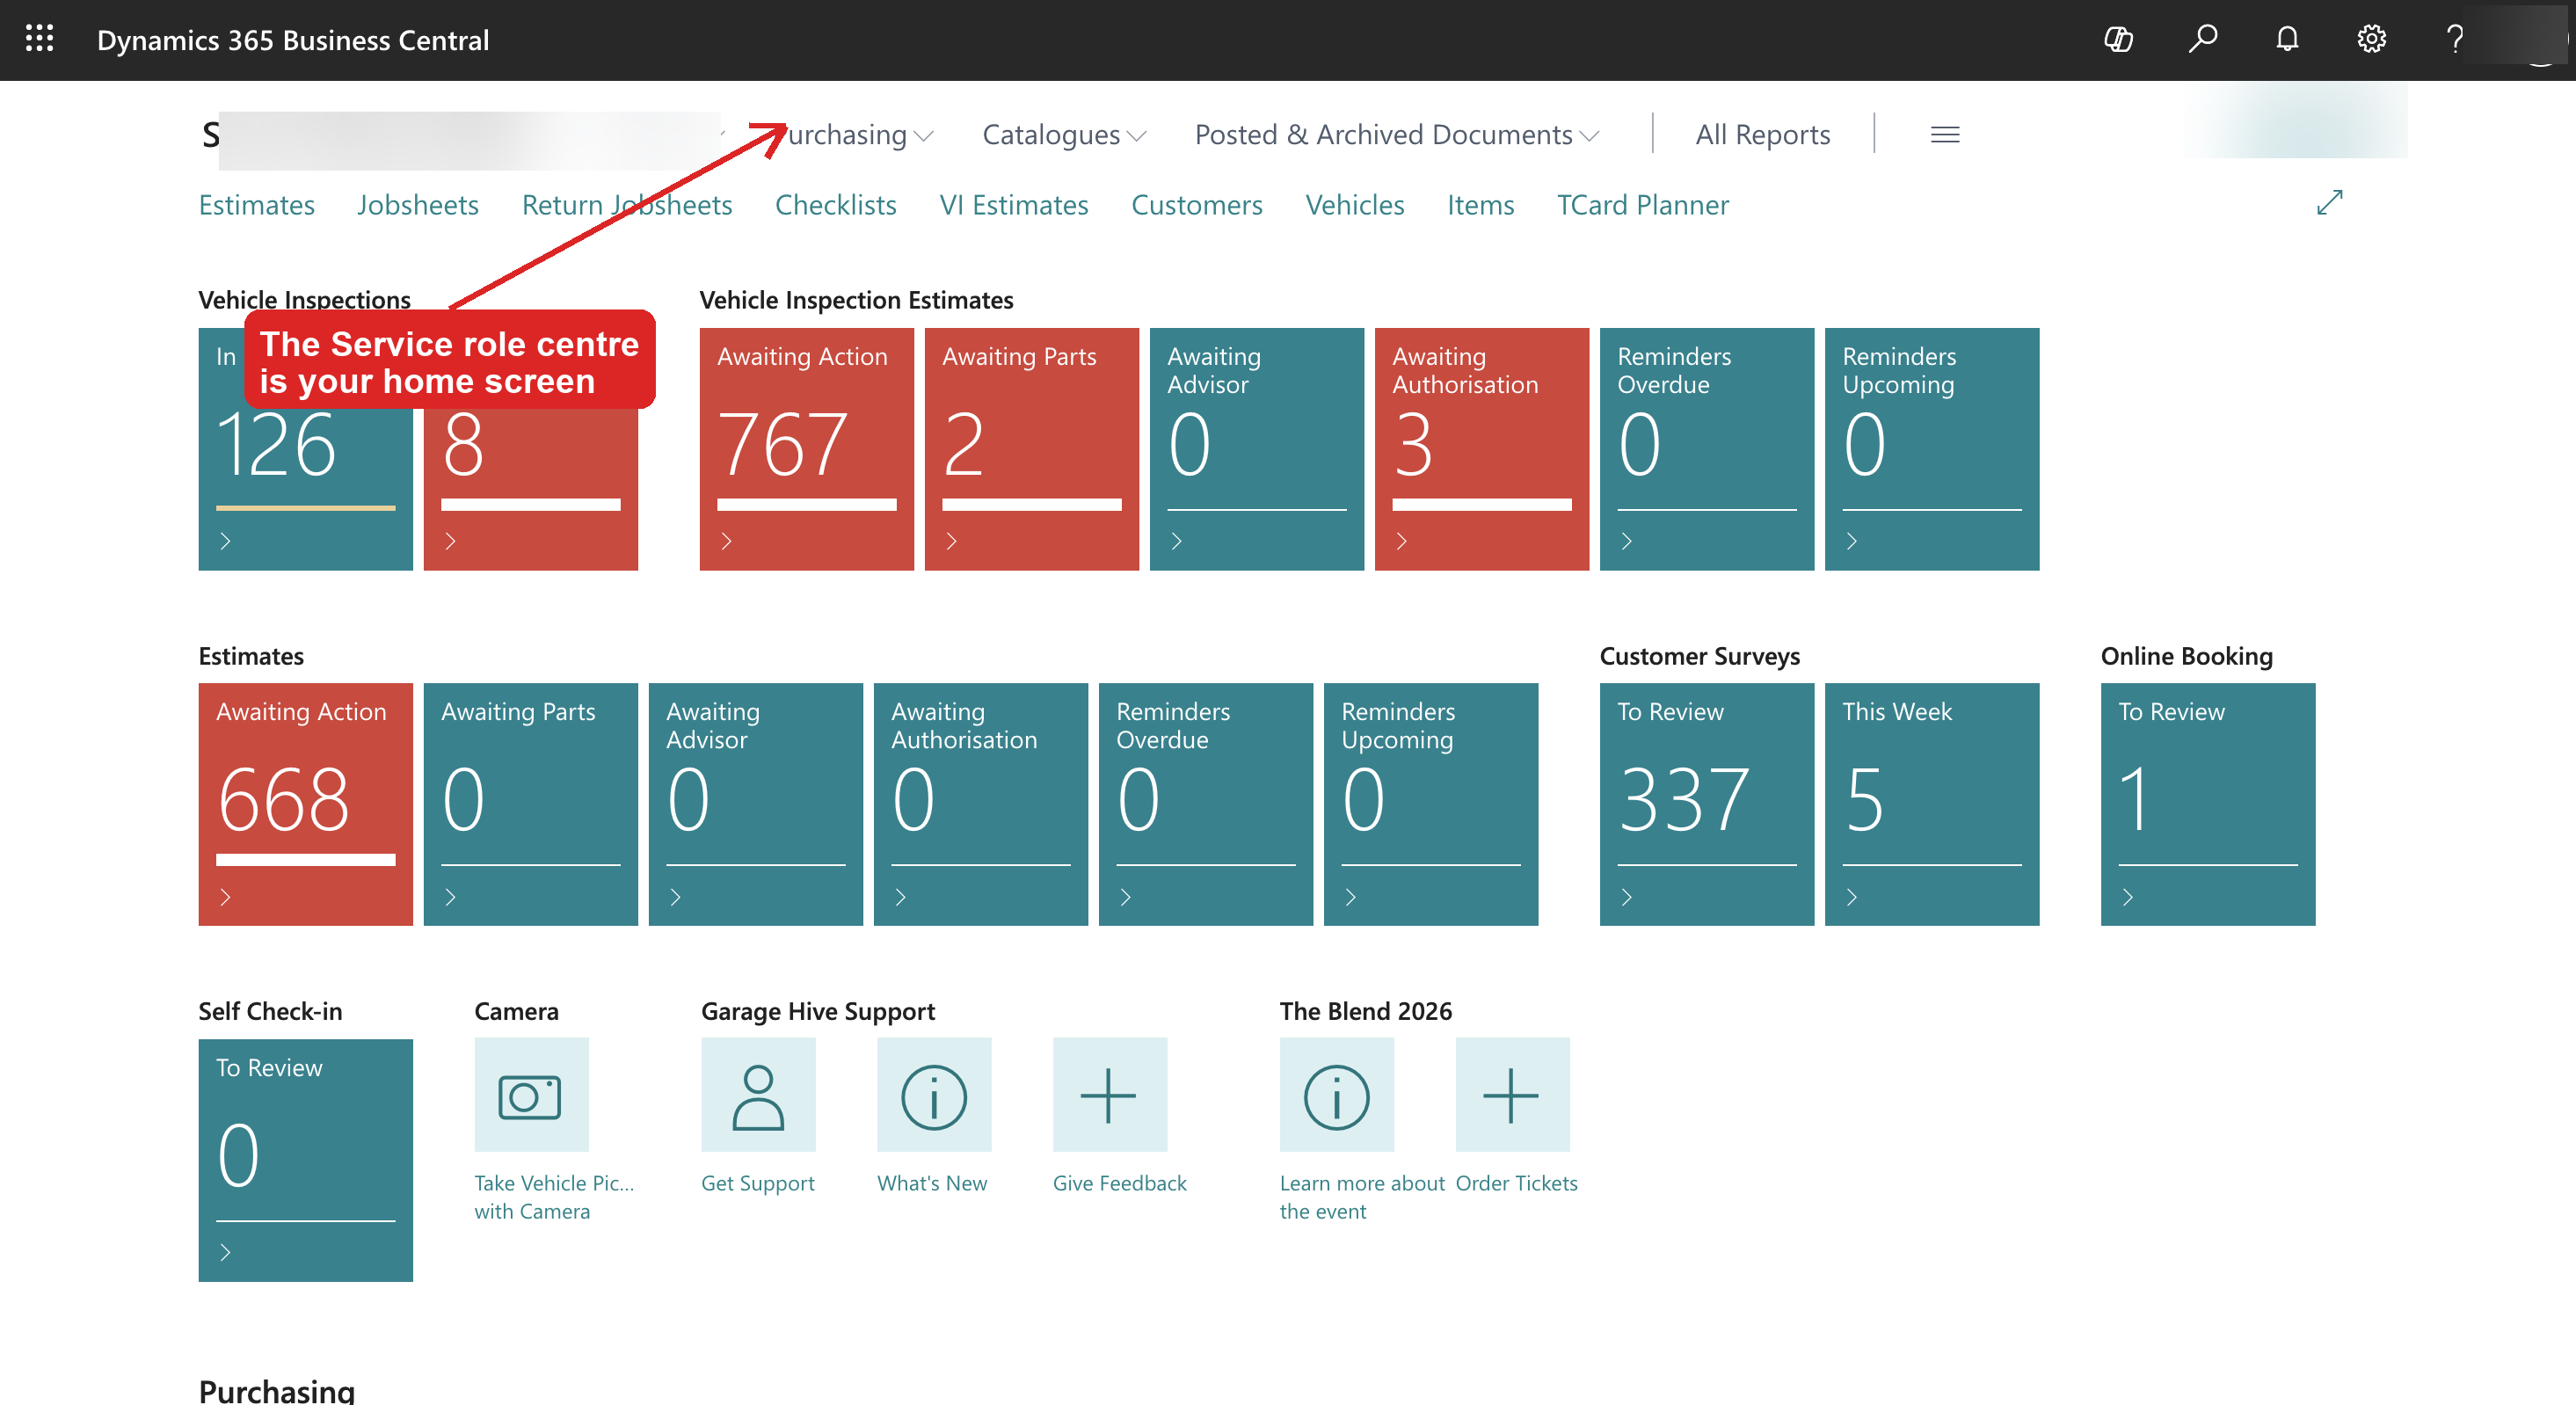
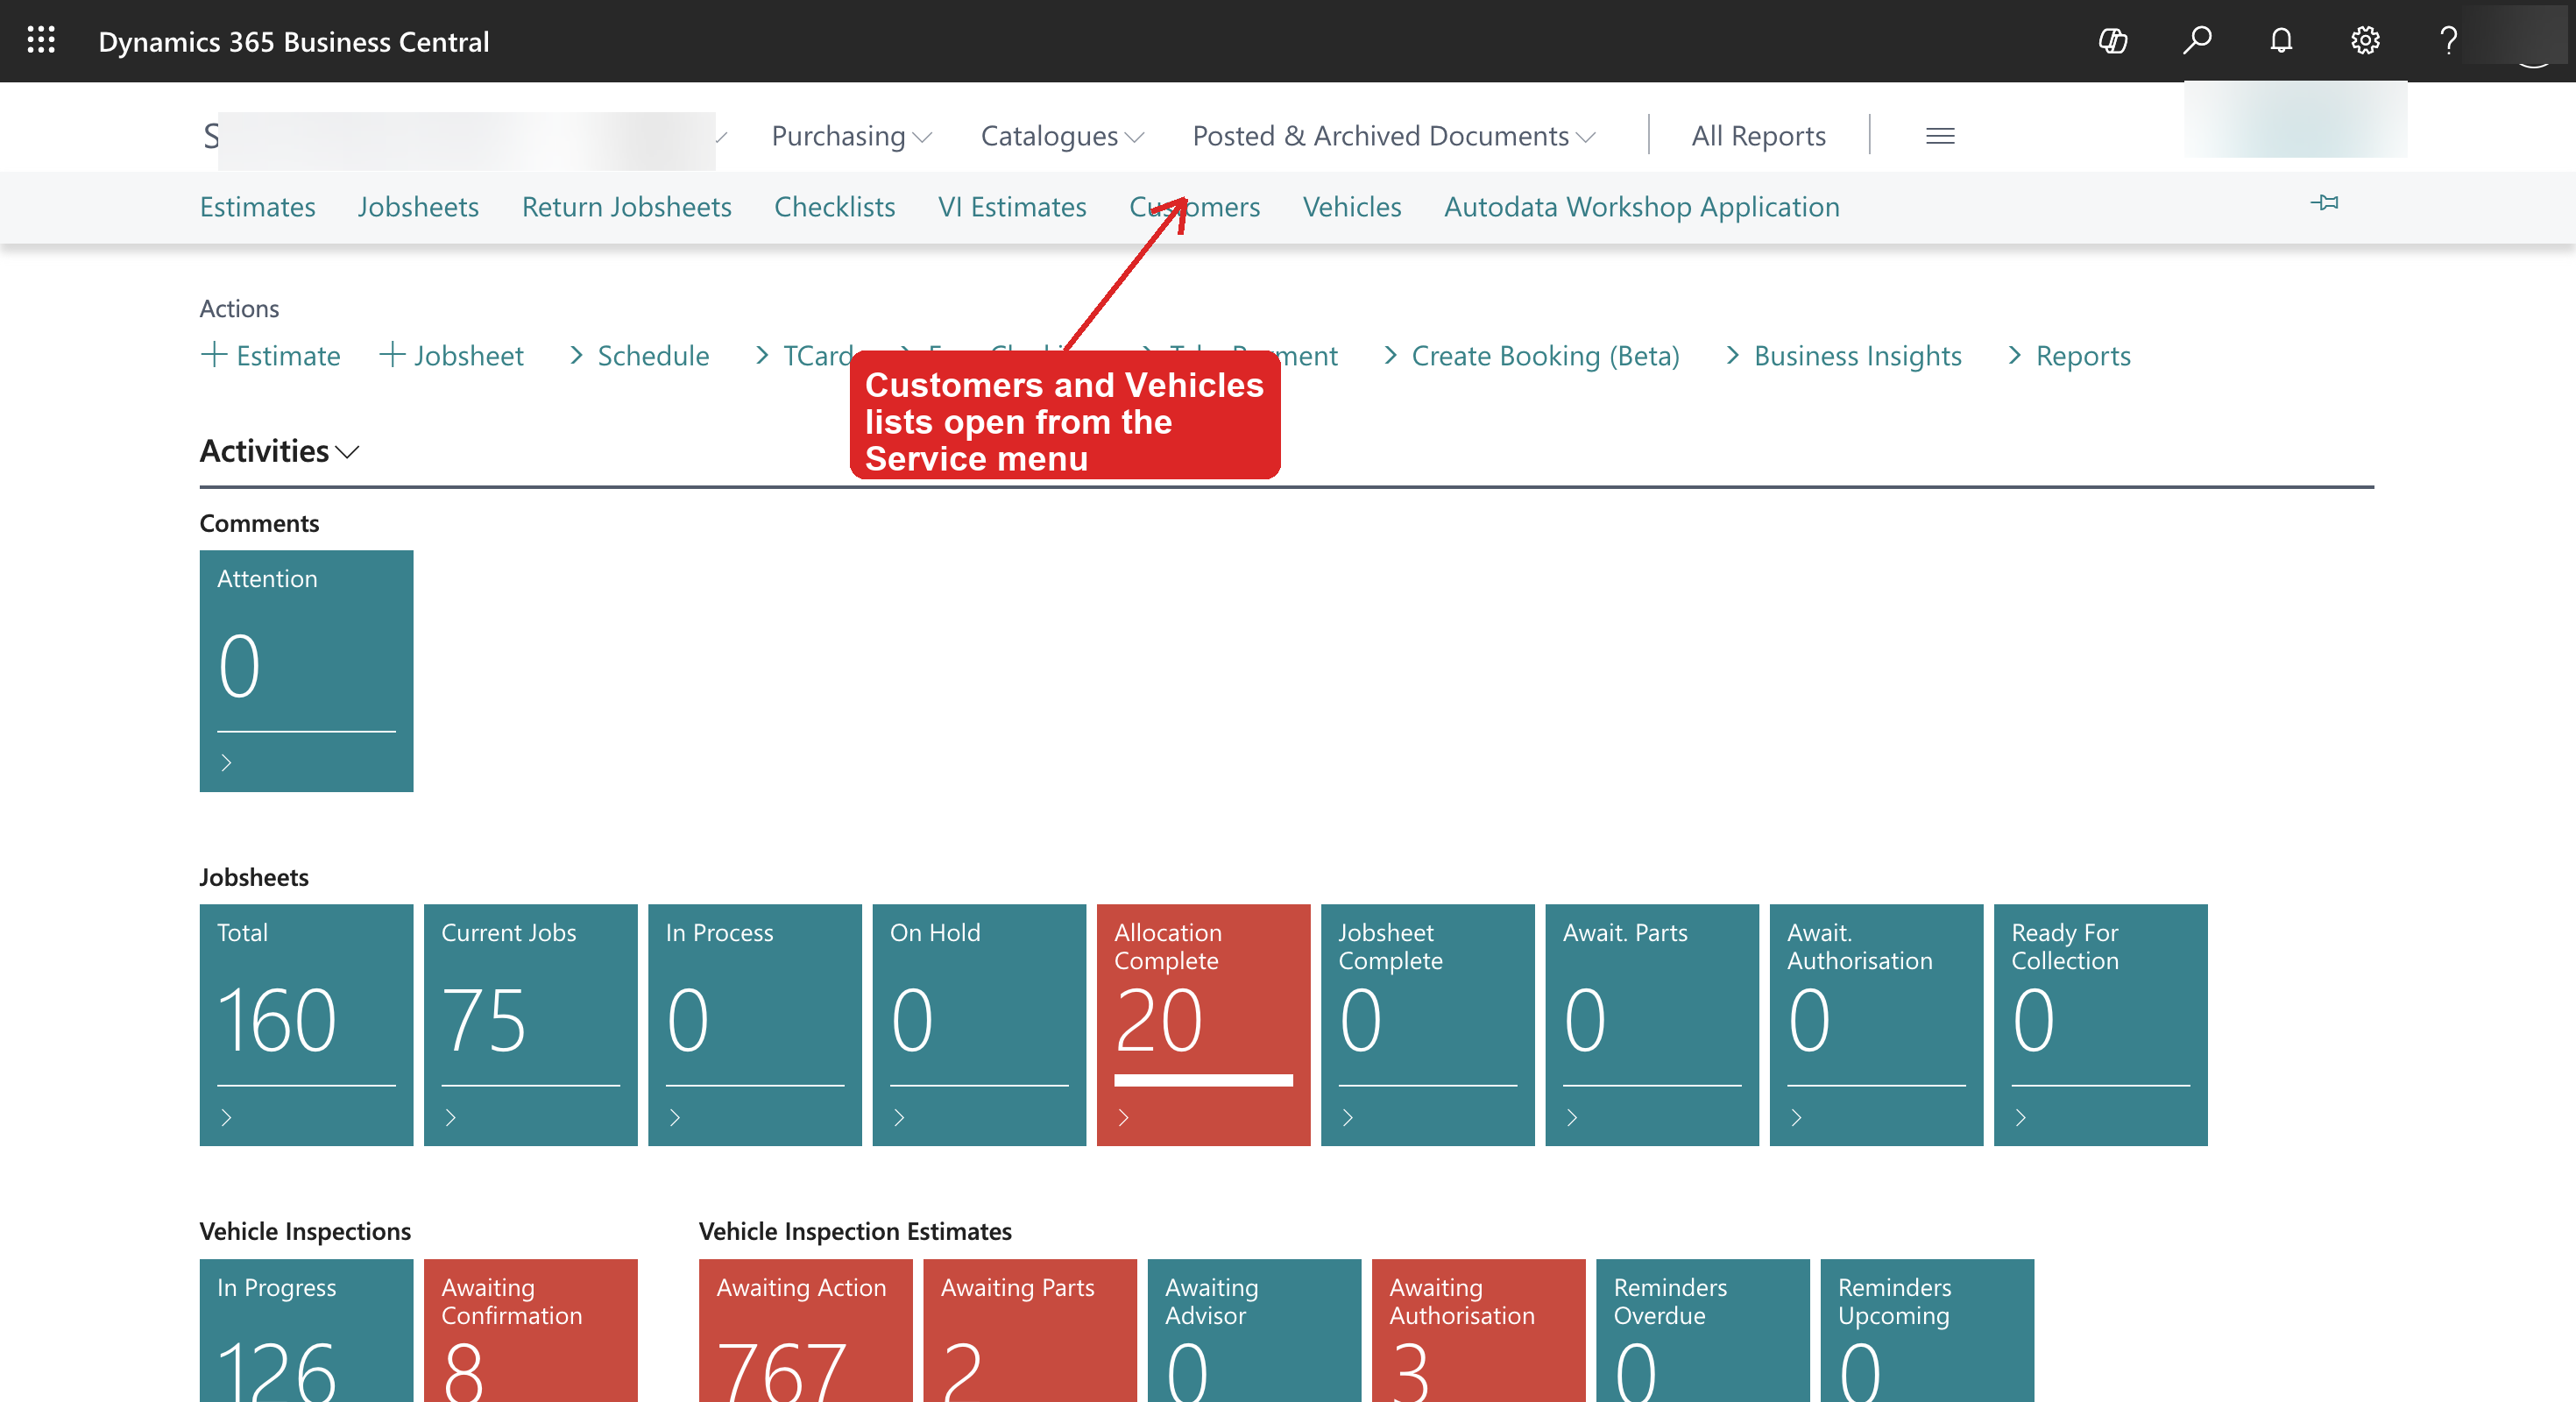
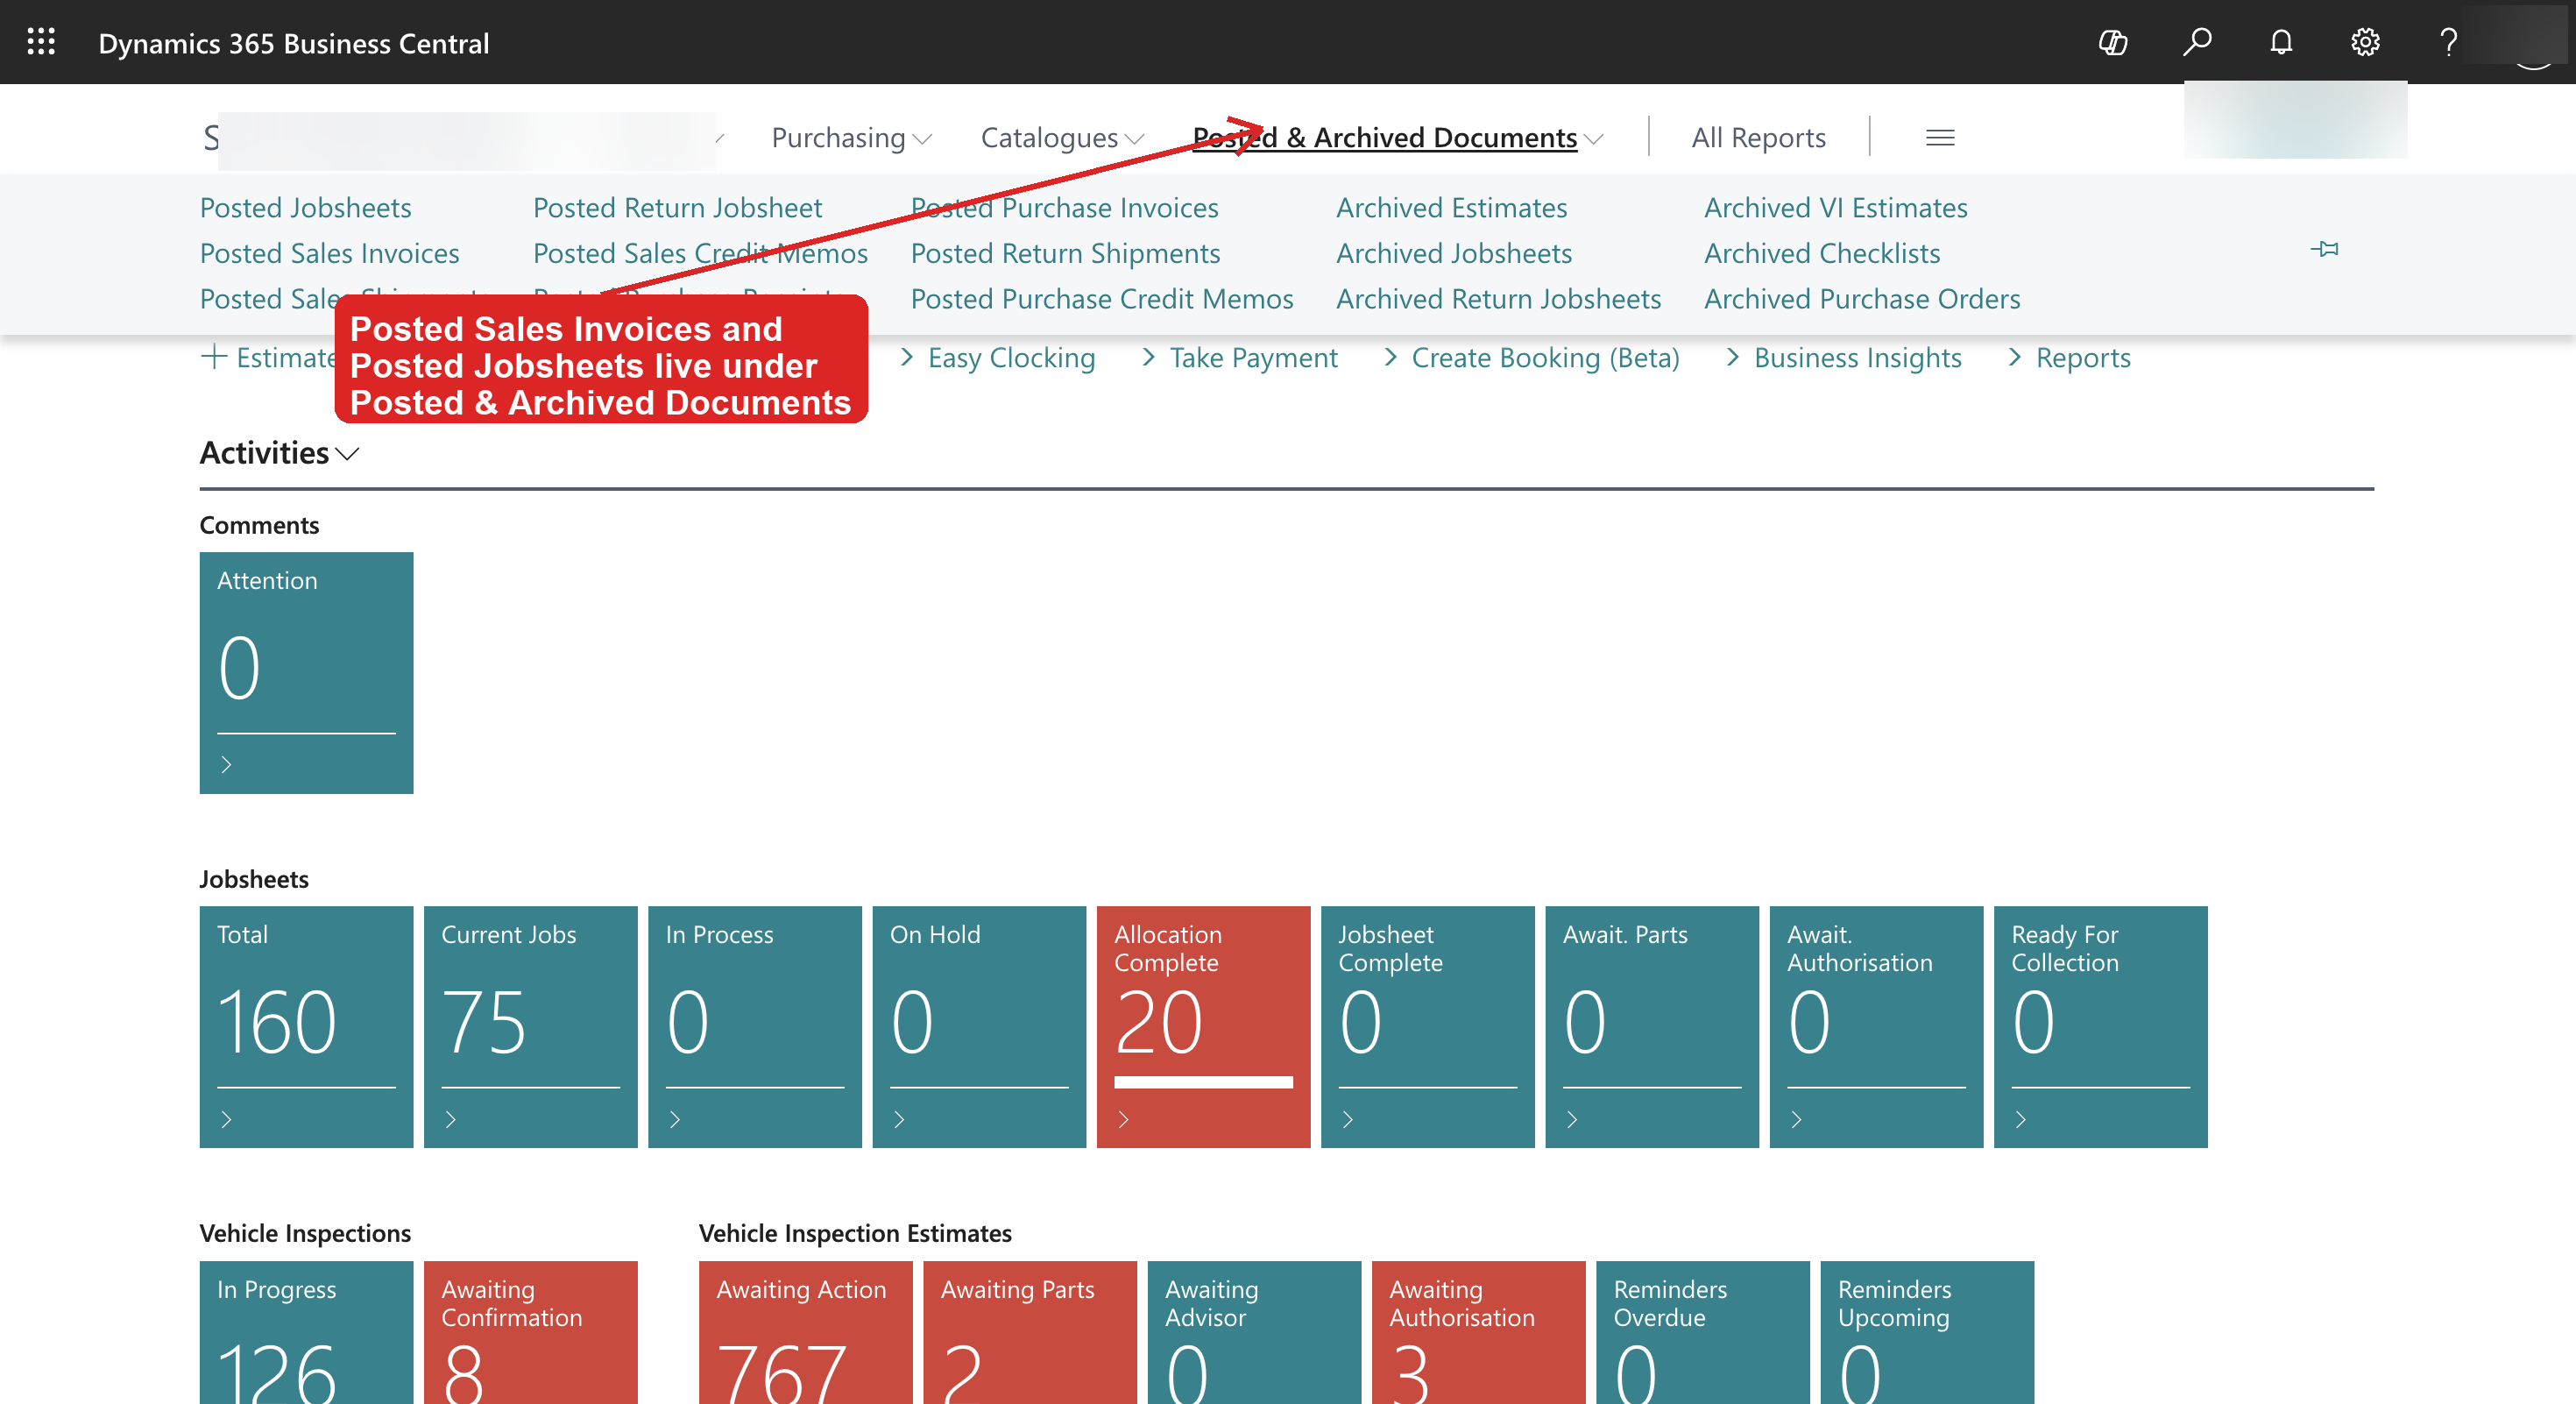
The lists you need live in two menus along the top:
- Customers and Vehicles are under the Service menu.
- Posted Sales Invoices and Posted Jobsheets are under Posted & Archived Documents.
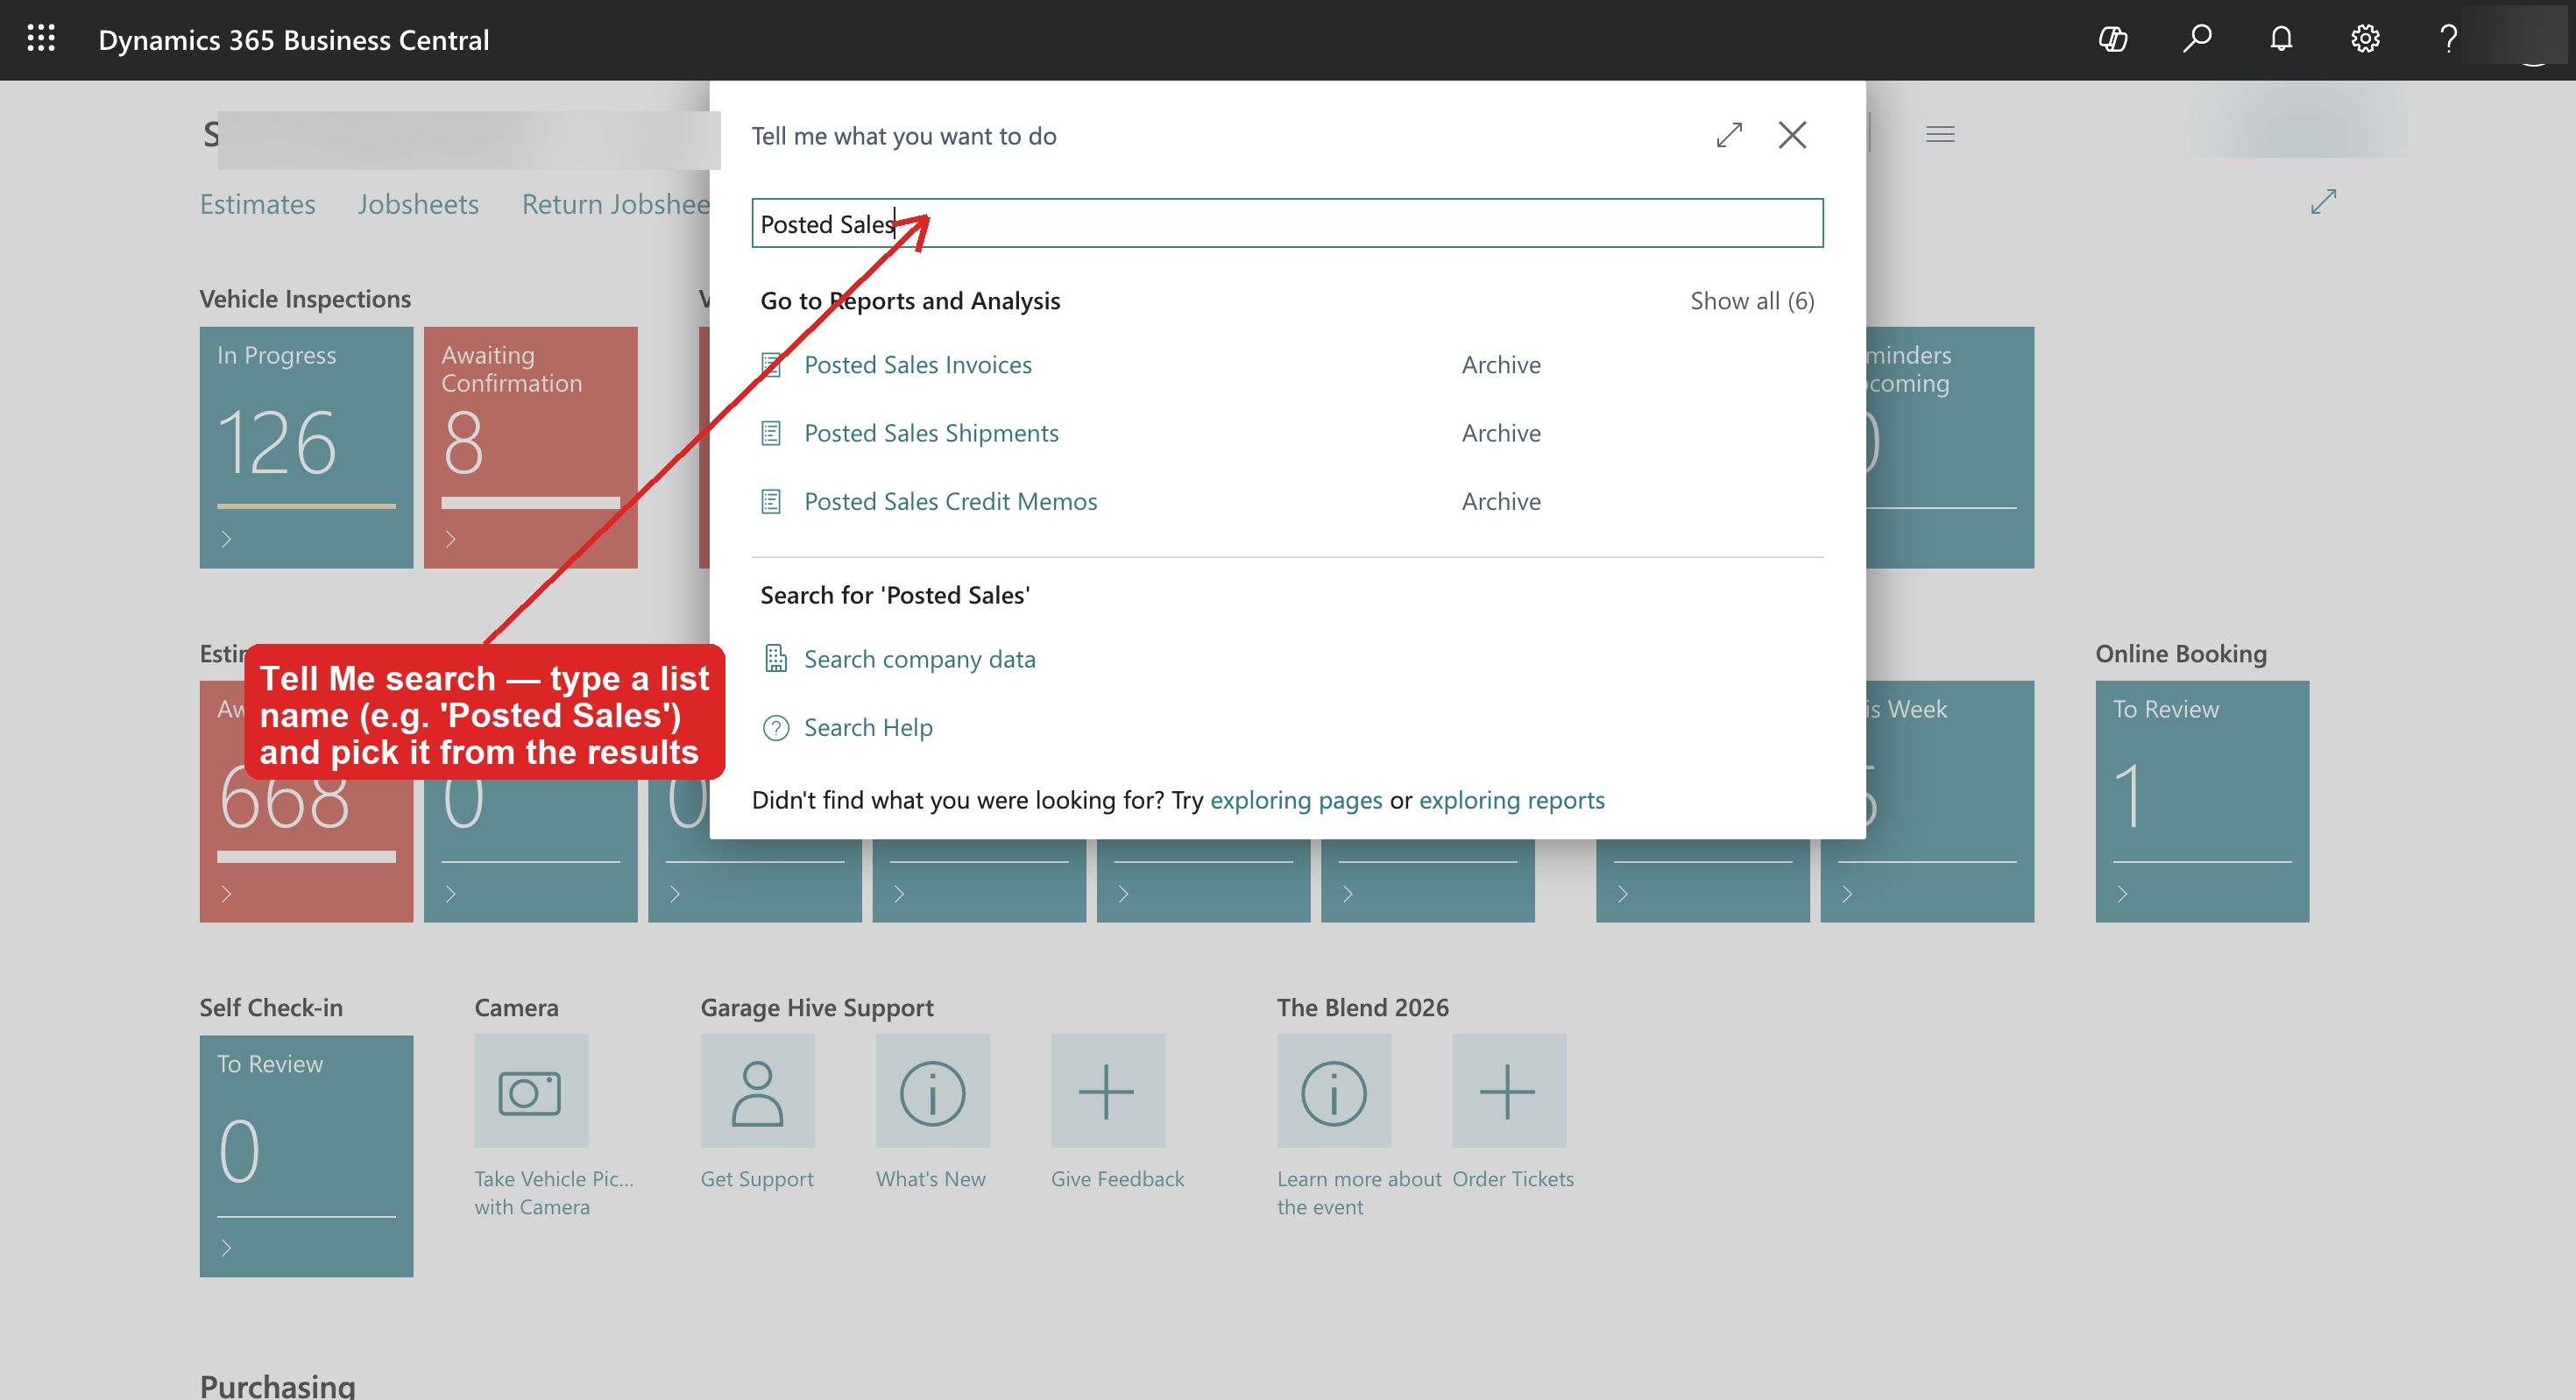
If you can't find a list in the menus, just search for it.
The general pattern (every list)
- Click the search / "Tell me" icon (the magnifying glass, top-right) and type the list name.
- Open the list and clear any date filter so you get the full history, not just a recent window.
- (If a column needs adding — see below.)
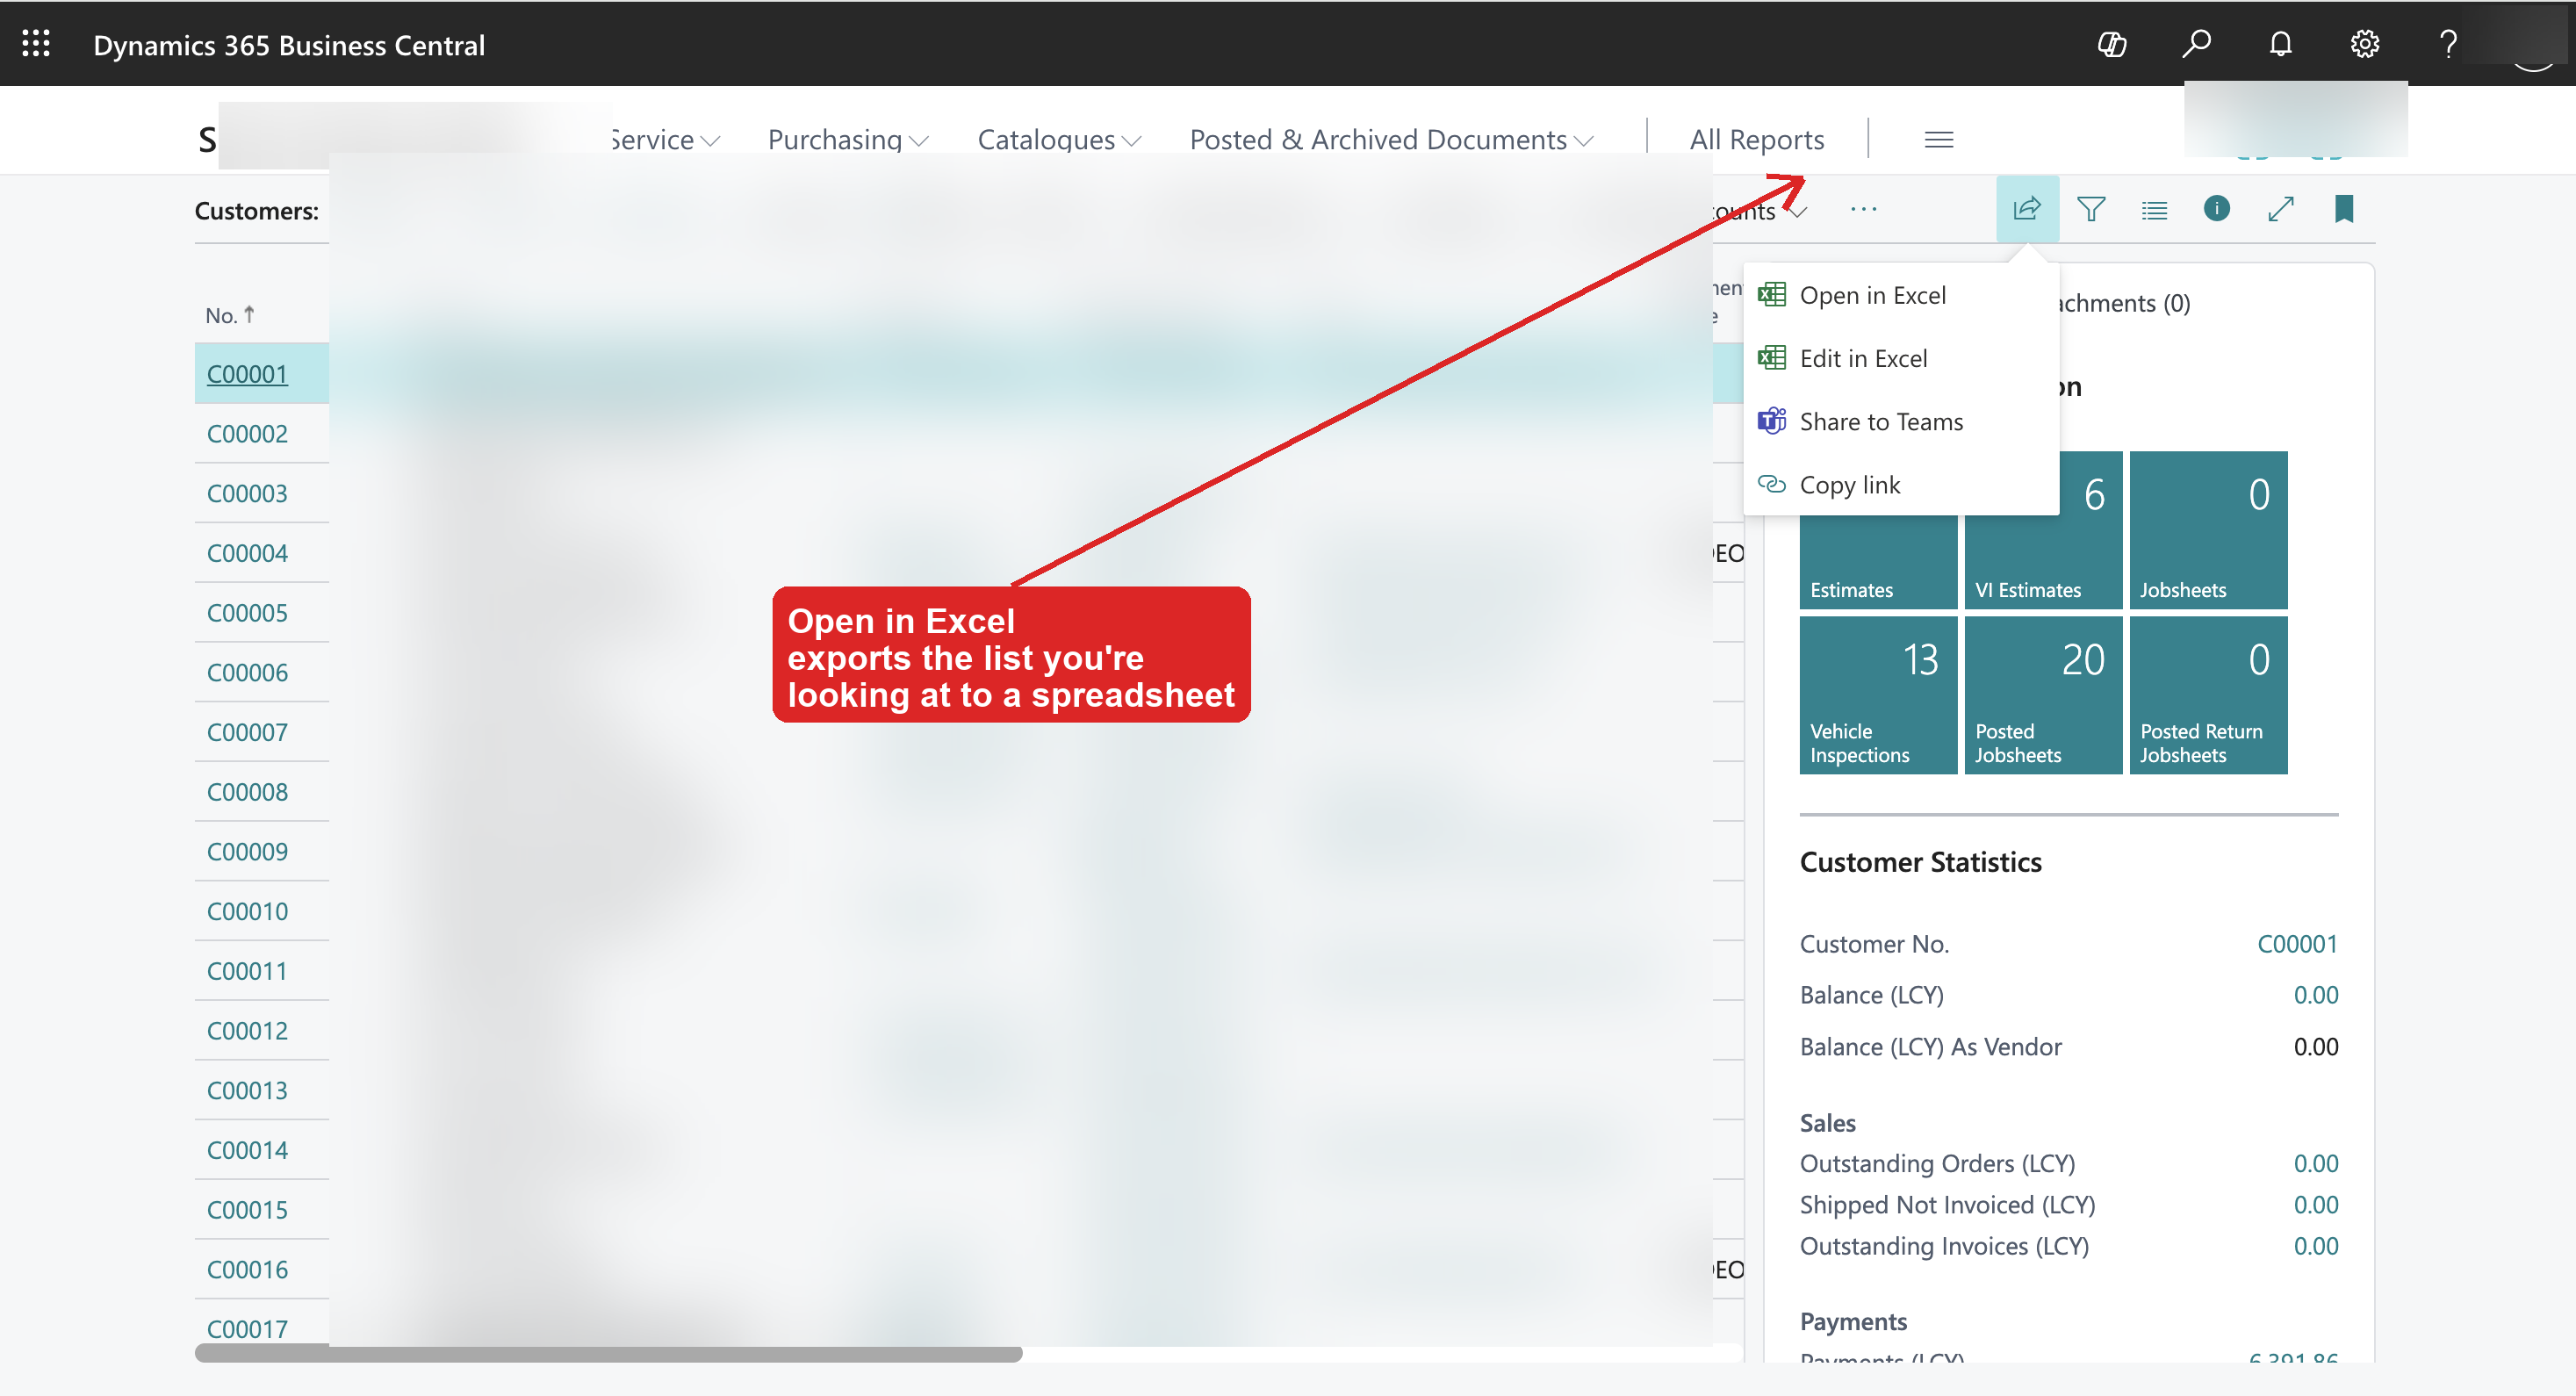
- Page actions → Open in Excel. Save the spreadsheet.
Adding a column (Personalise)
The basic migration needs this once — for the address columns on Customers — and otherwise only for the optional extras in the table above.
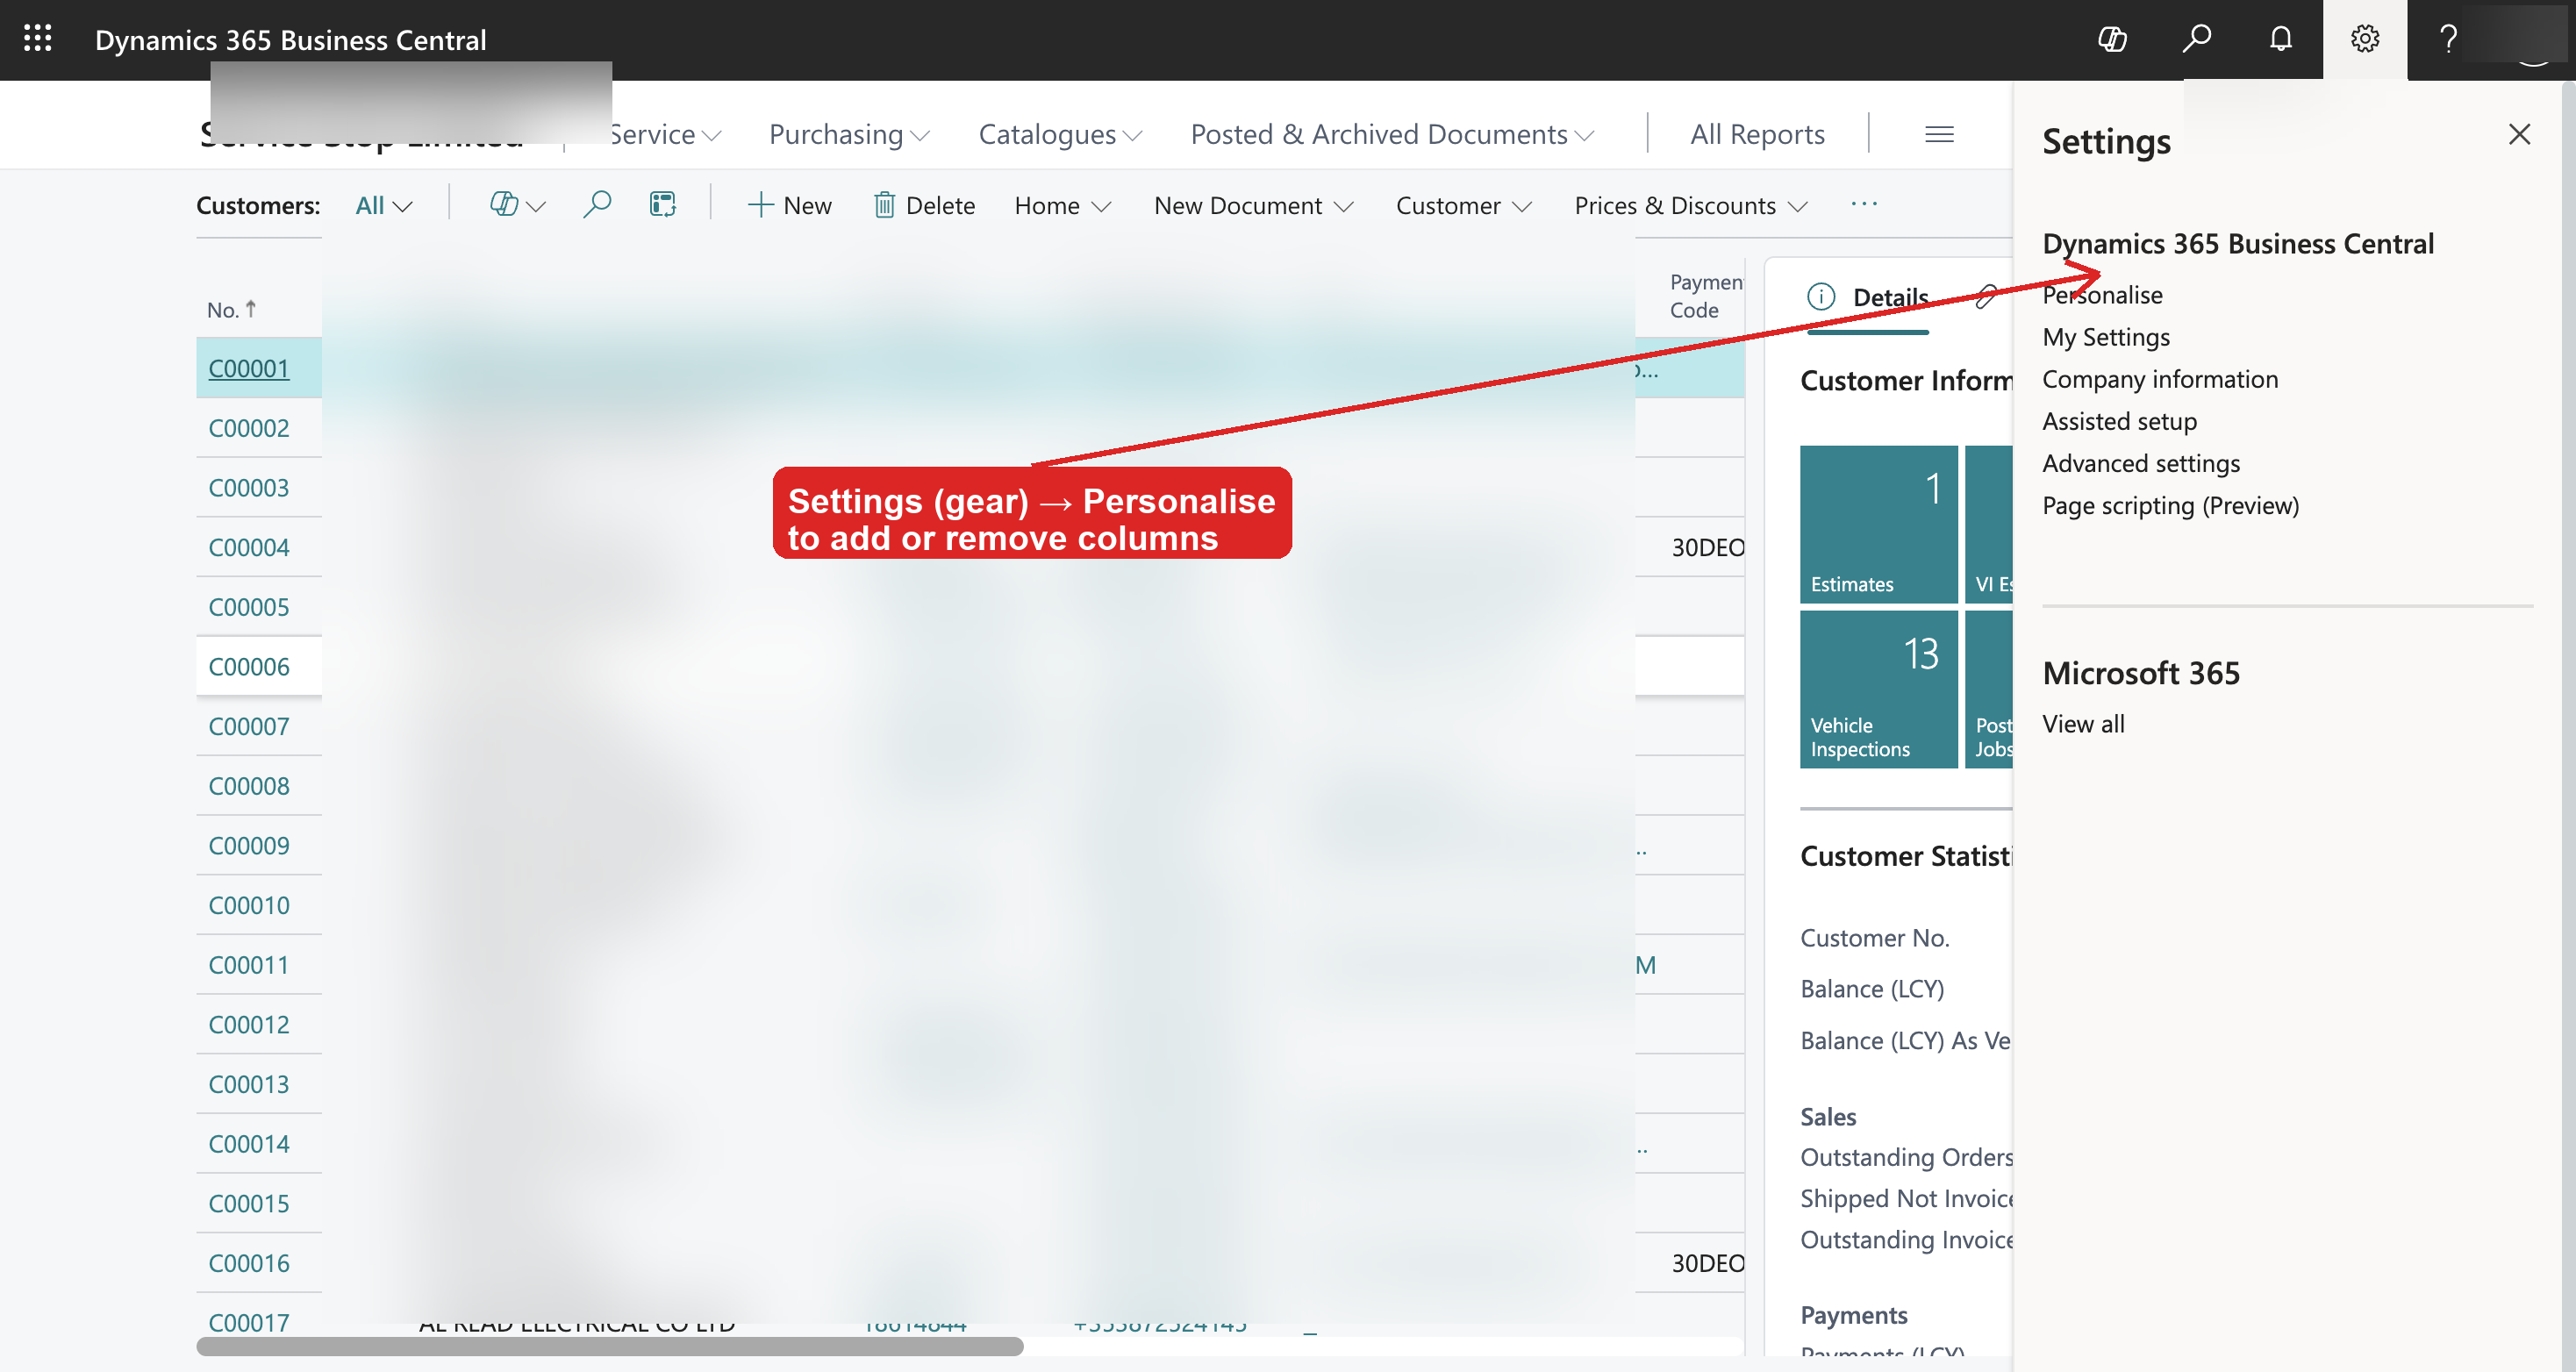
- Open the list, click the gear / settings ⚙ (top-right) → Personalise.
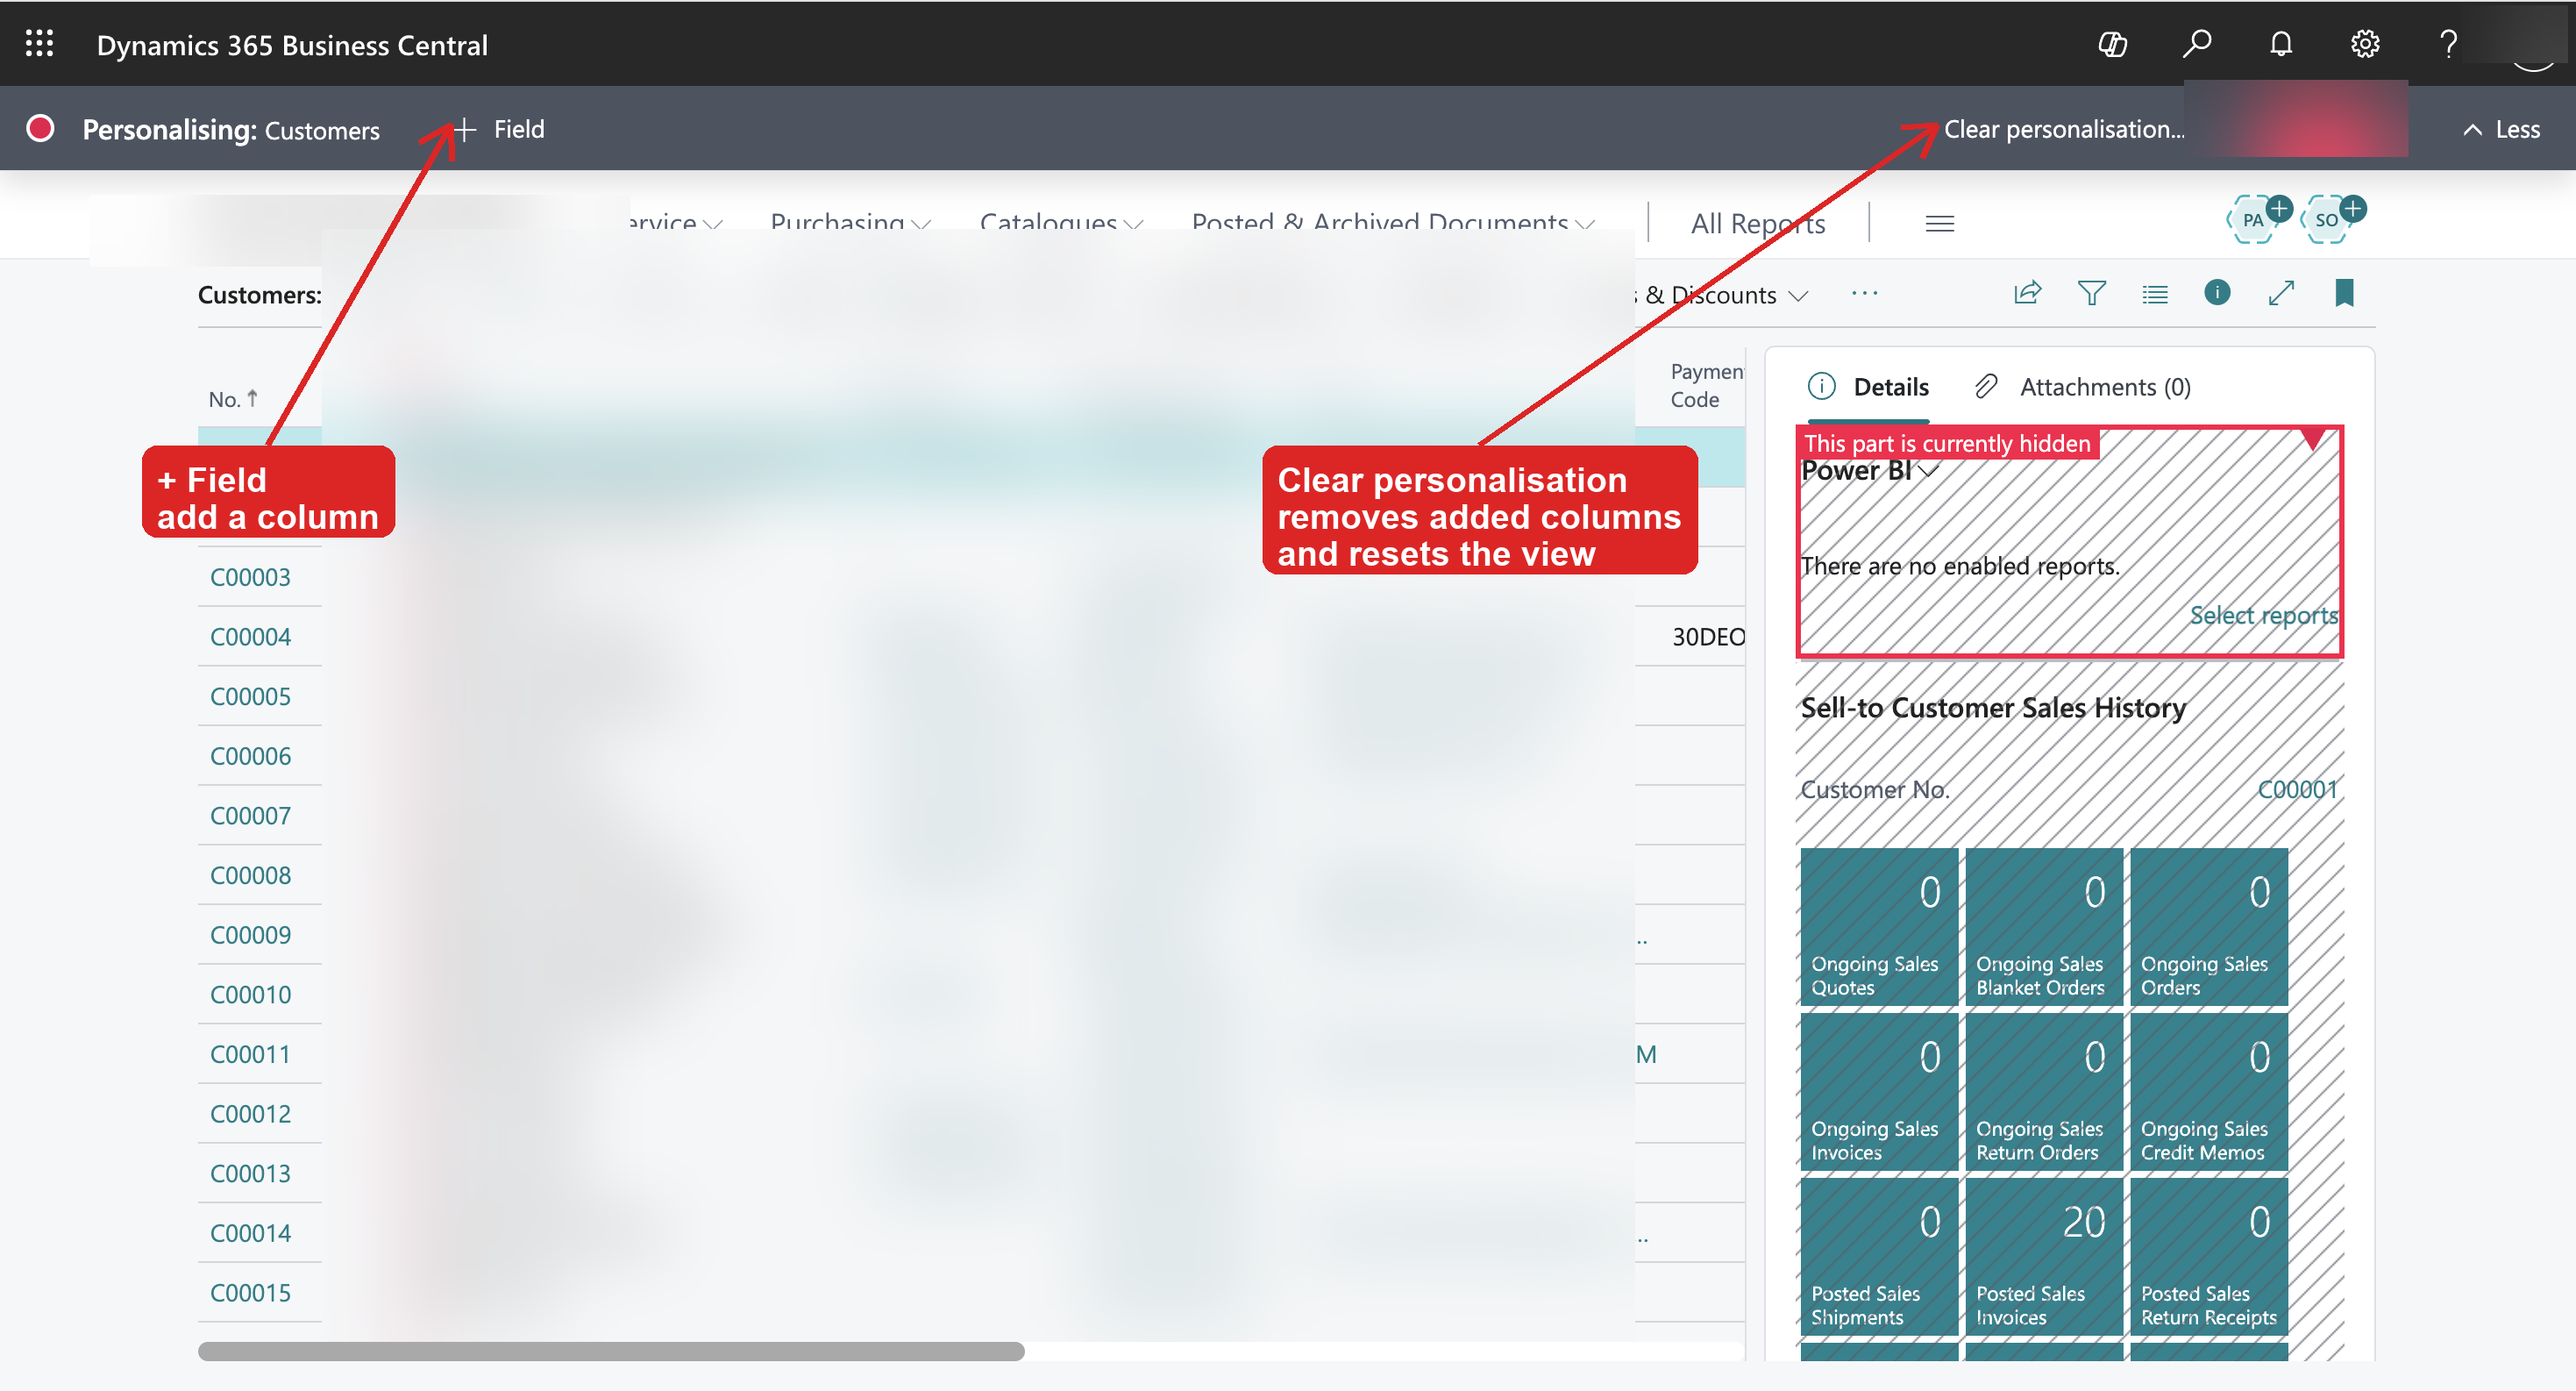
- A coloured banner appears across the top. Click + Field — a field panel slides out on the right.
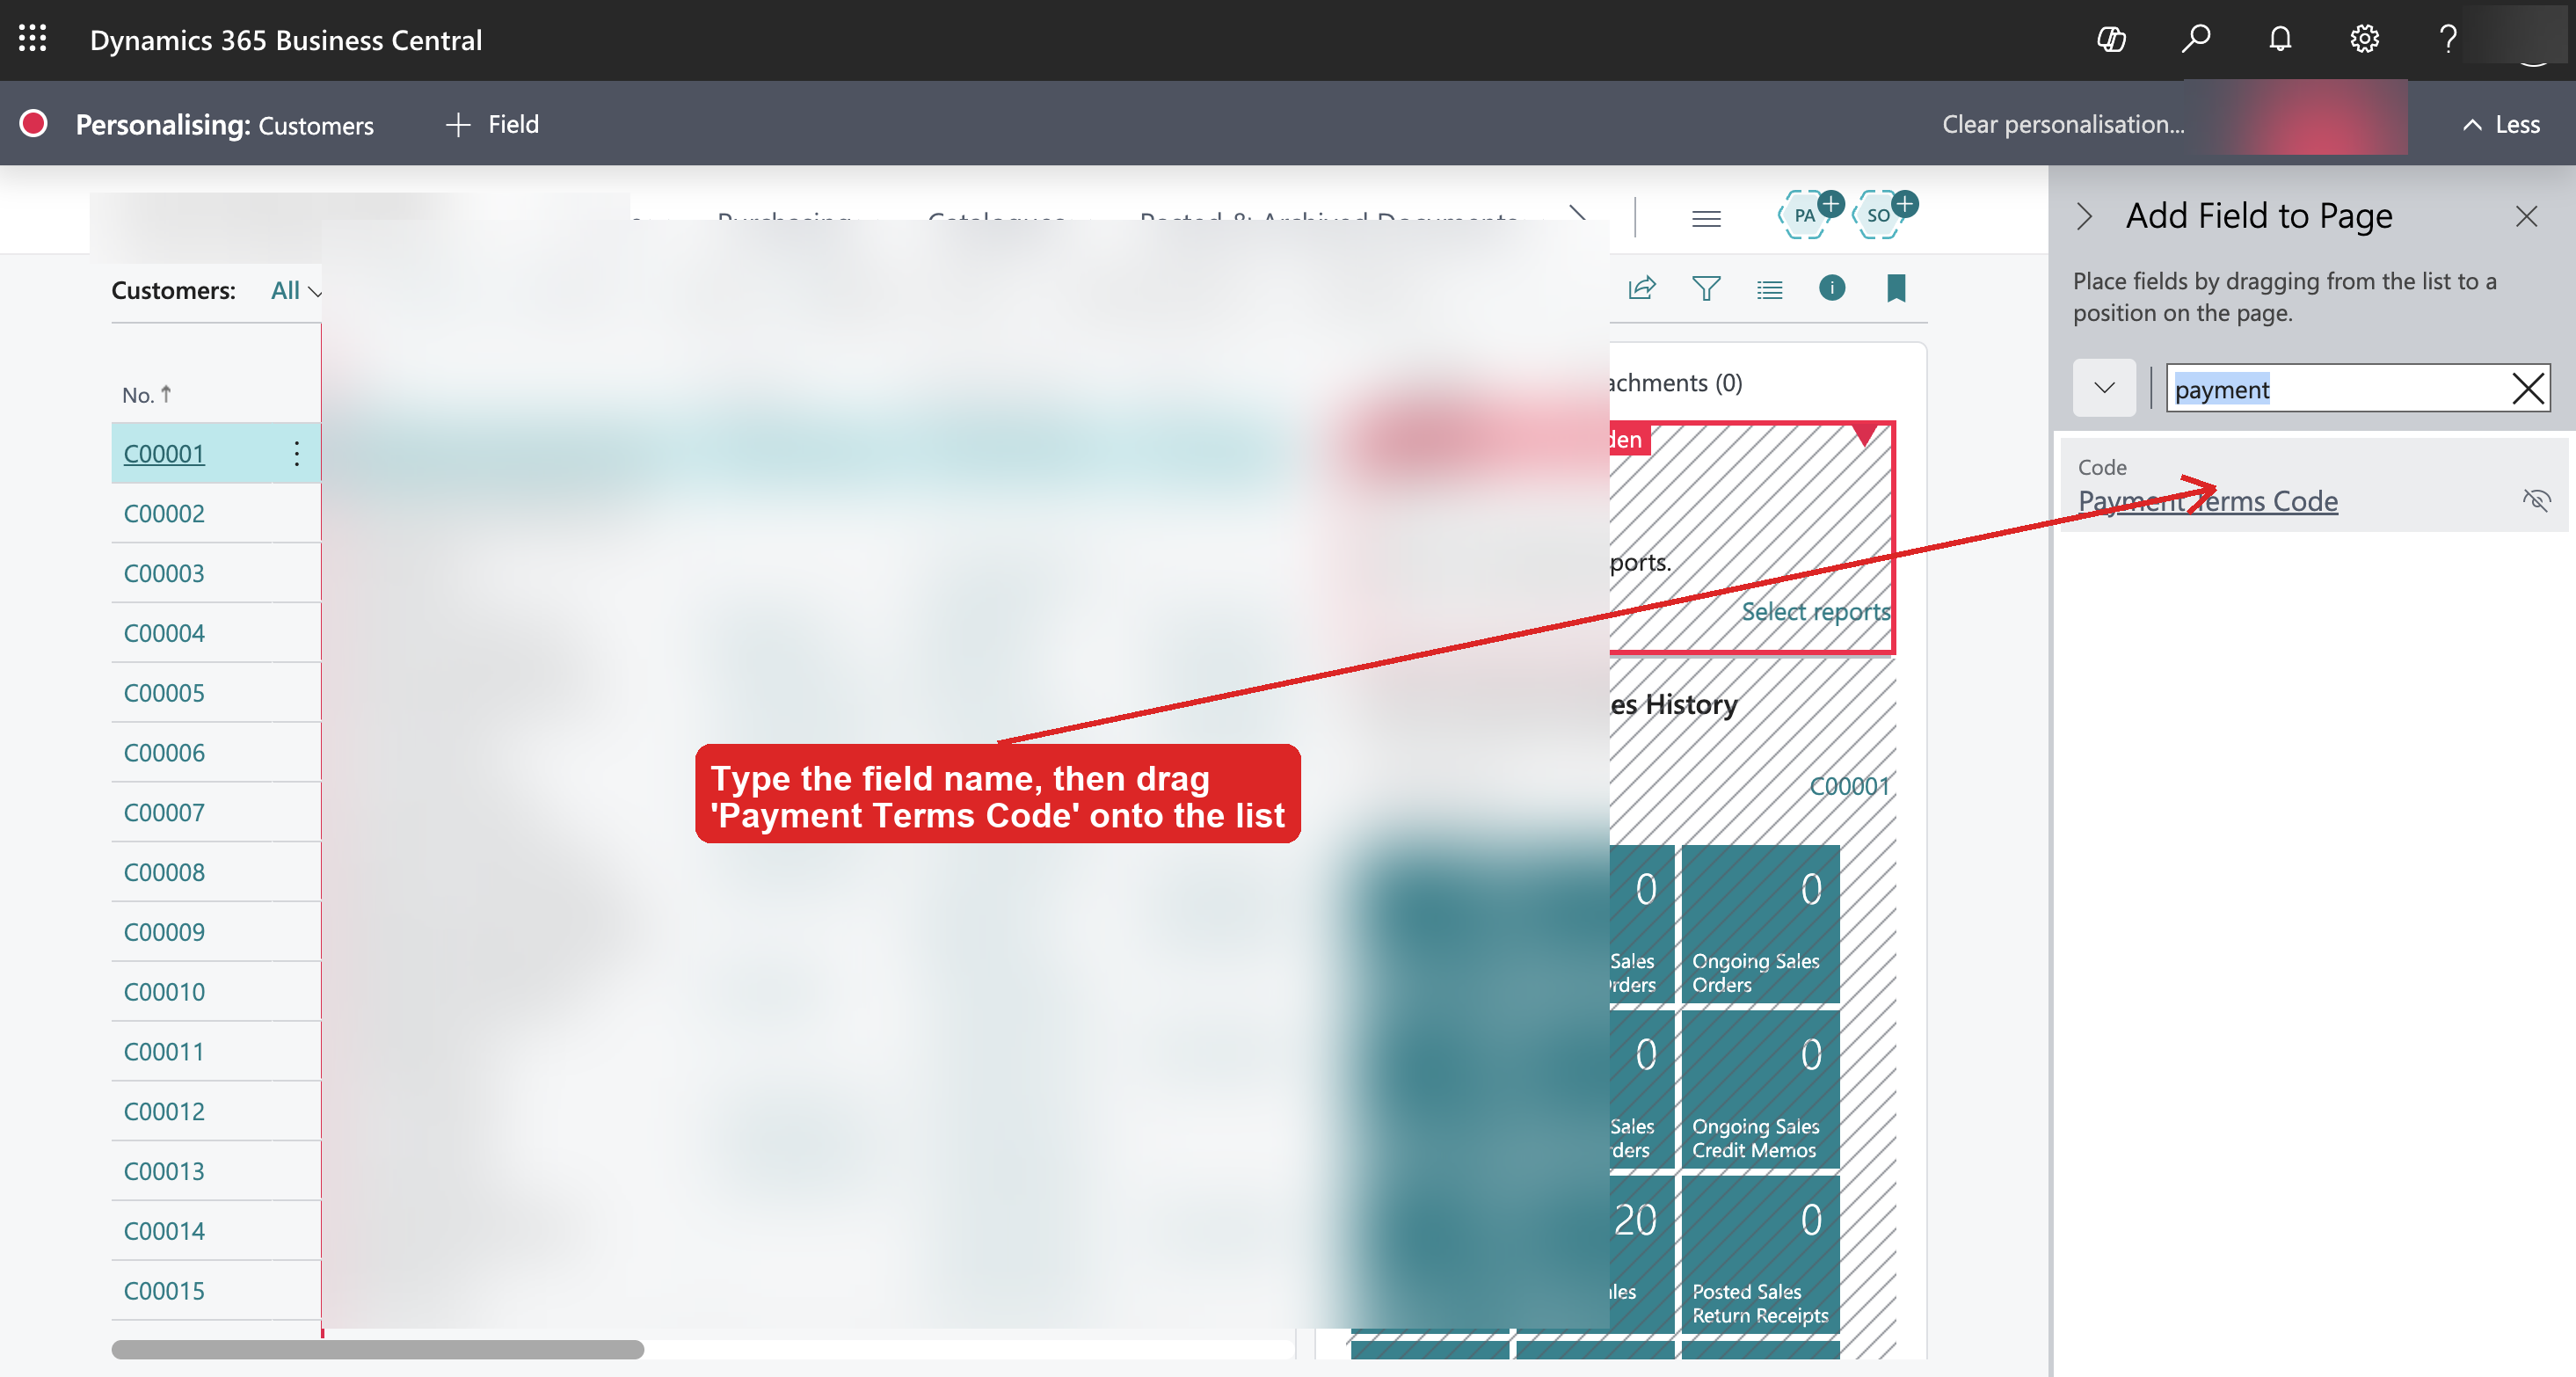
- Type the field name to find it, then drag it onto the column header row where you want it.
- To reposition a column, drag its header left or right.
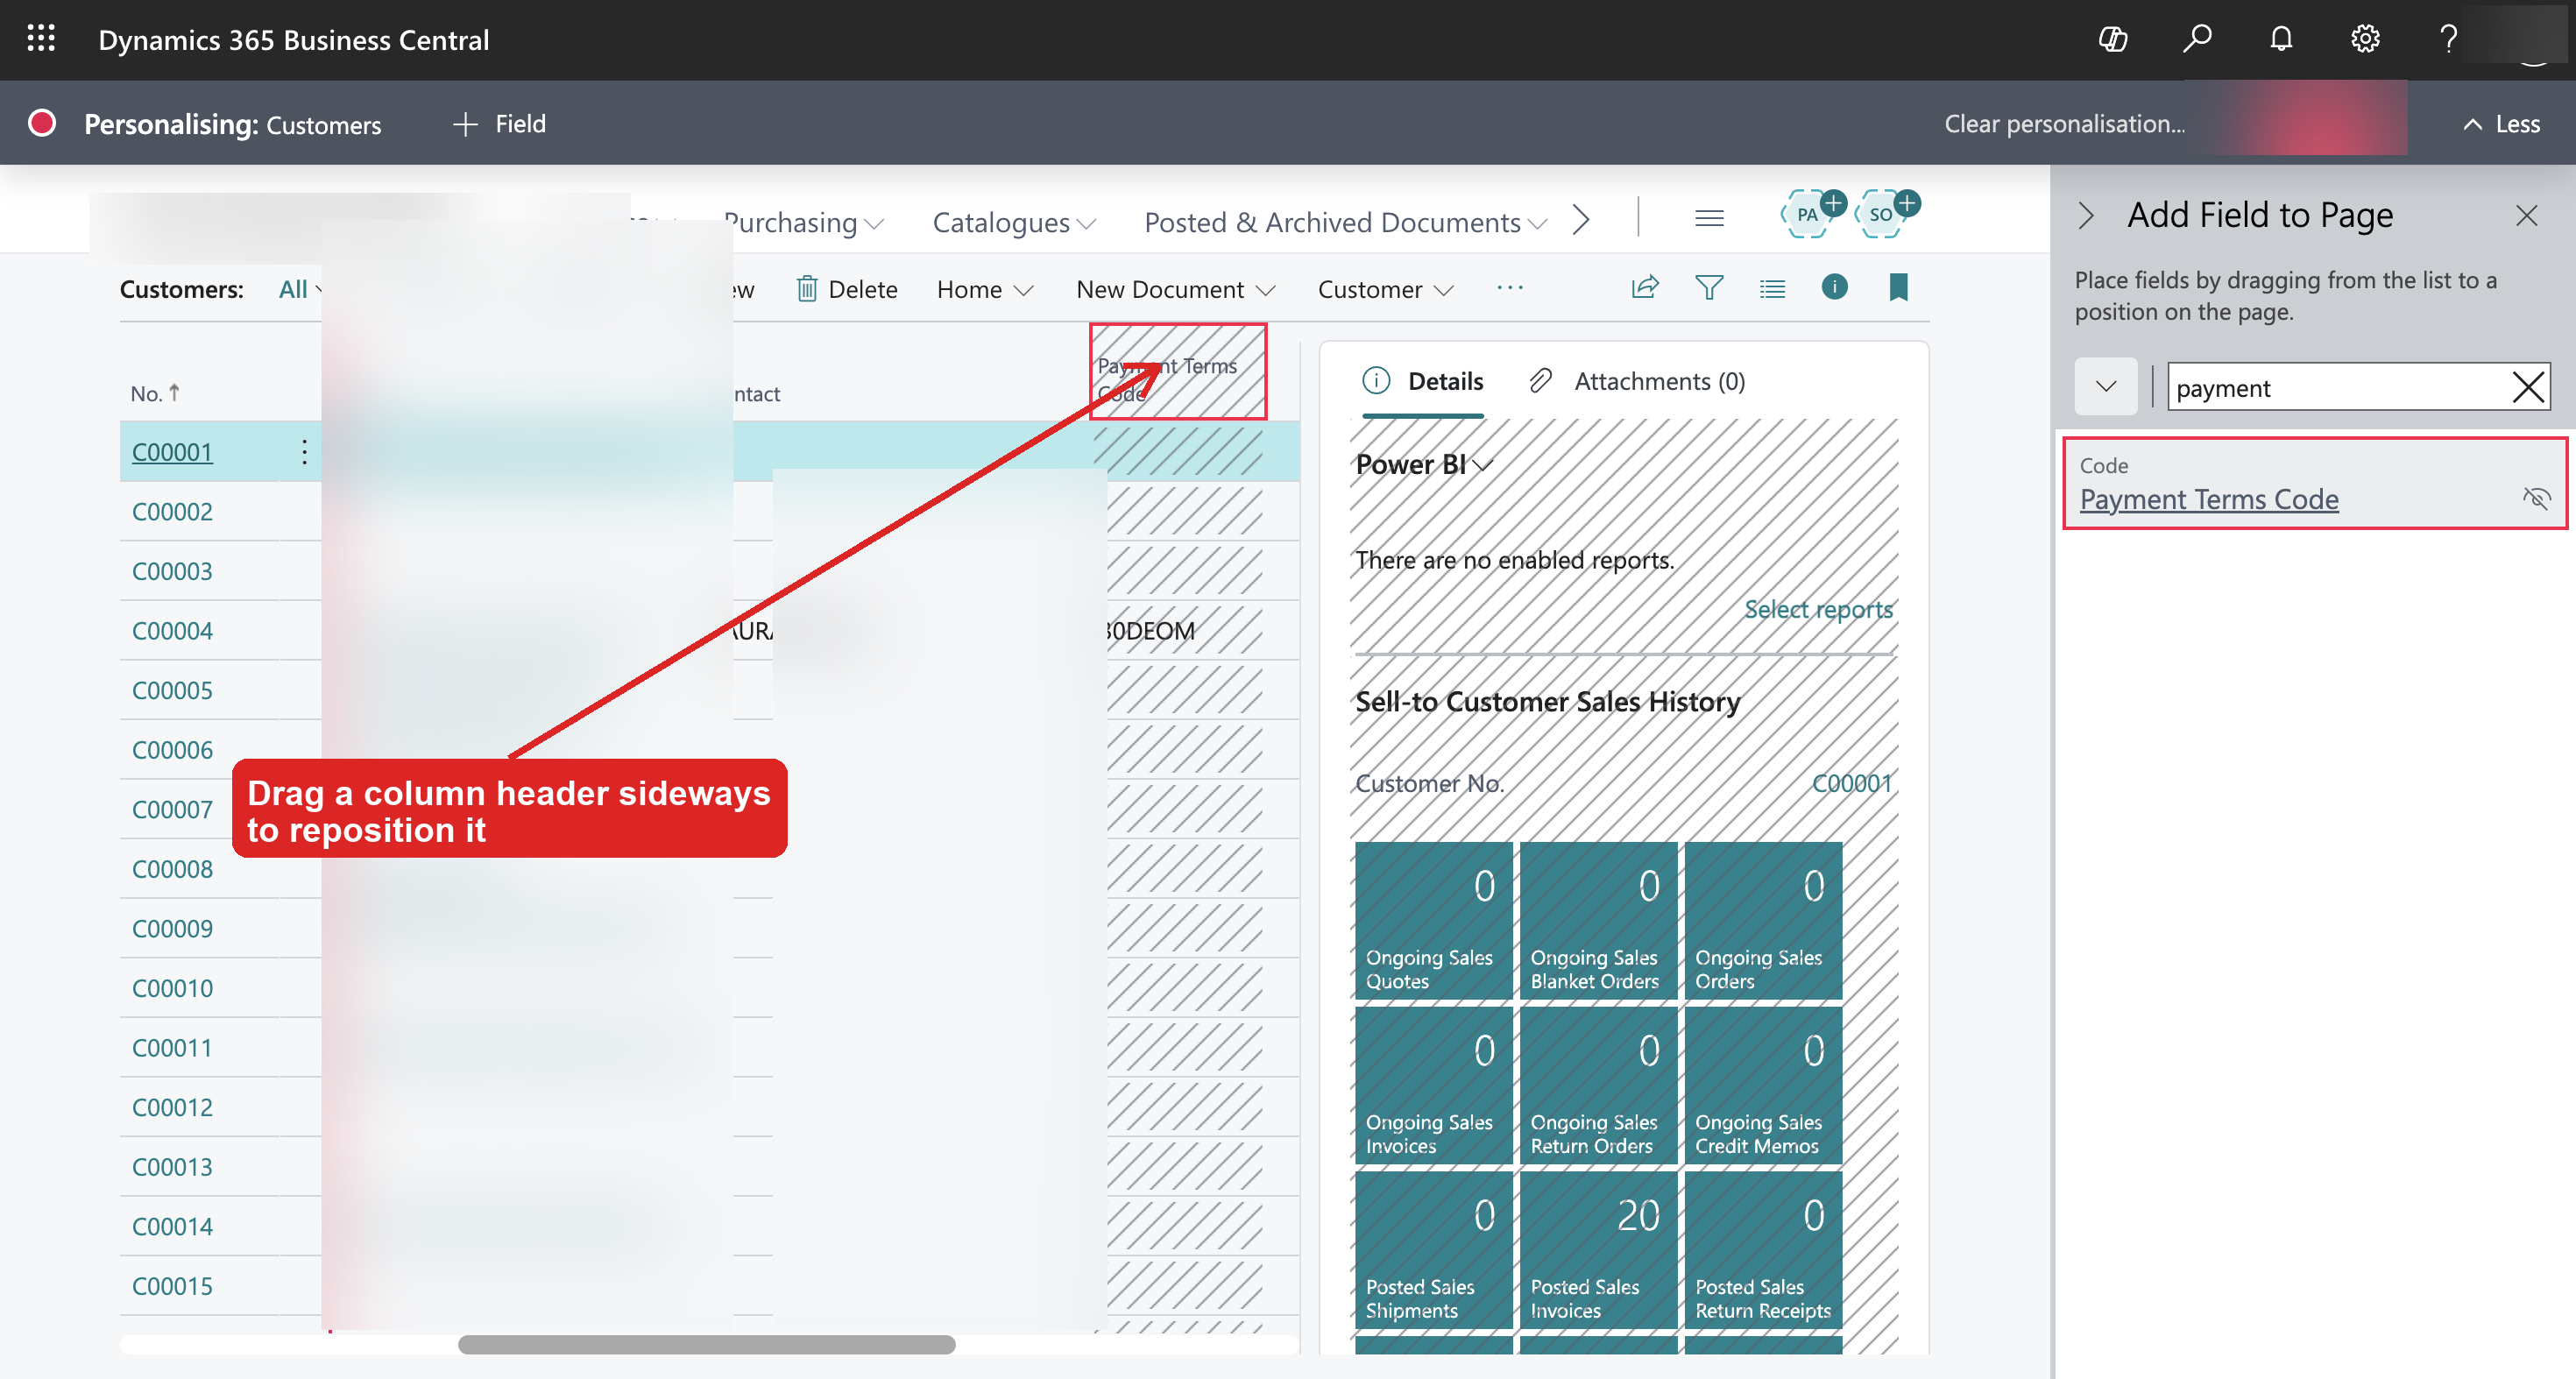
- Click Done to exit. Made a mess? Clear personalisation (next to Done in the banner) removes the columns you added and resets the view.
- Refresh the page (F5). This matters: "Open in Excel" exports a cached view, so without a refresh the new column is left out. (This is the number-one reason a personalised column doesn't show up in the export.)
- Check the new column is showing, then Open in Excel.
Each file
1. Customers — add the address first
Garage Hive's standard Customers list has no address columns, so an export straight off the list brings every customer across without an address. Add them before you export:
- Search Customers and open the list.
- ⚙ → Personalise → + Field, then find and drag each of these onto the column header row:
Address,Address 2,City,Post Code. - Click Done, then refresh the page (F5) — without the refresh the export leaves the new columns out.
- Check the four address columns are showing, then Open in Excel.
MechIQ joins the four into one tidy address per customer (street, then town, then post code), whatever order the columns are in.
Phone numbers: both Phone No. and Mobile Phone No. are read. When a customer has both, MechIQ keeps the mobile, because customer messages go by SMS.
If you have account customers, Payment Terms Code is worth adding at the same time (the Open in Excel screenshot above shows the Customers list with it added on the right).
2. Vehicle List
Search Vehicle List → Open in Excel. No column to add — MechIQ reads each vehicle's job history to work out who owns it.
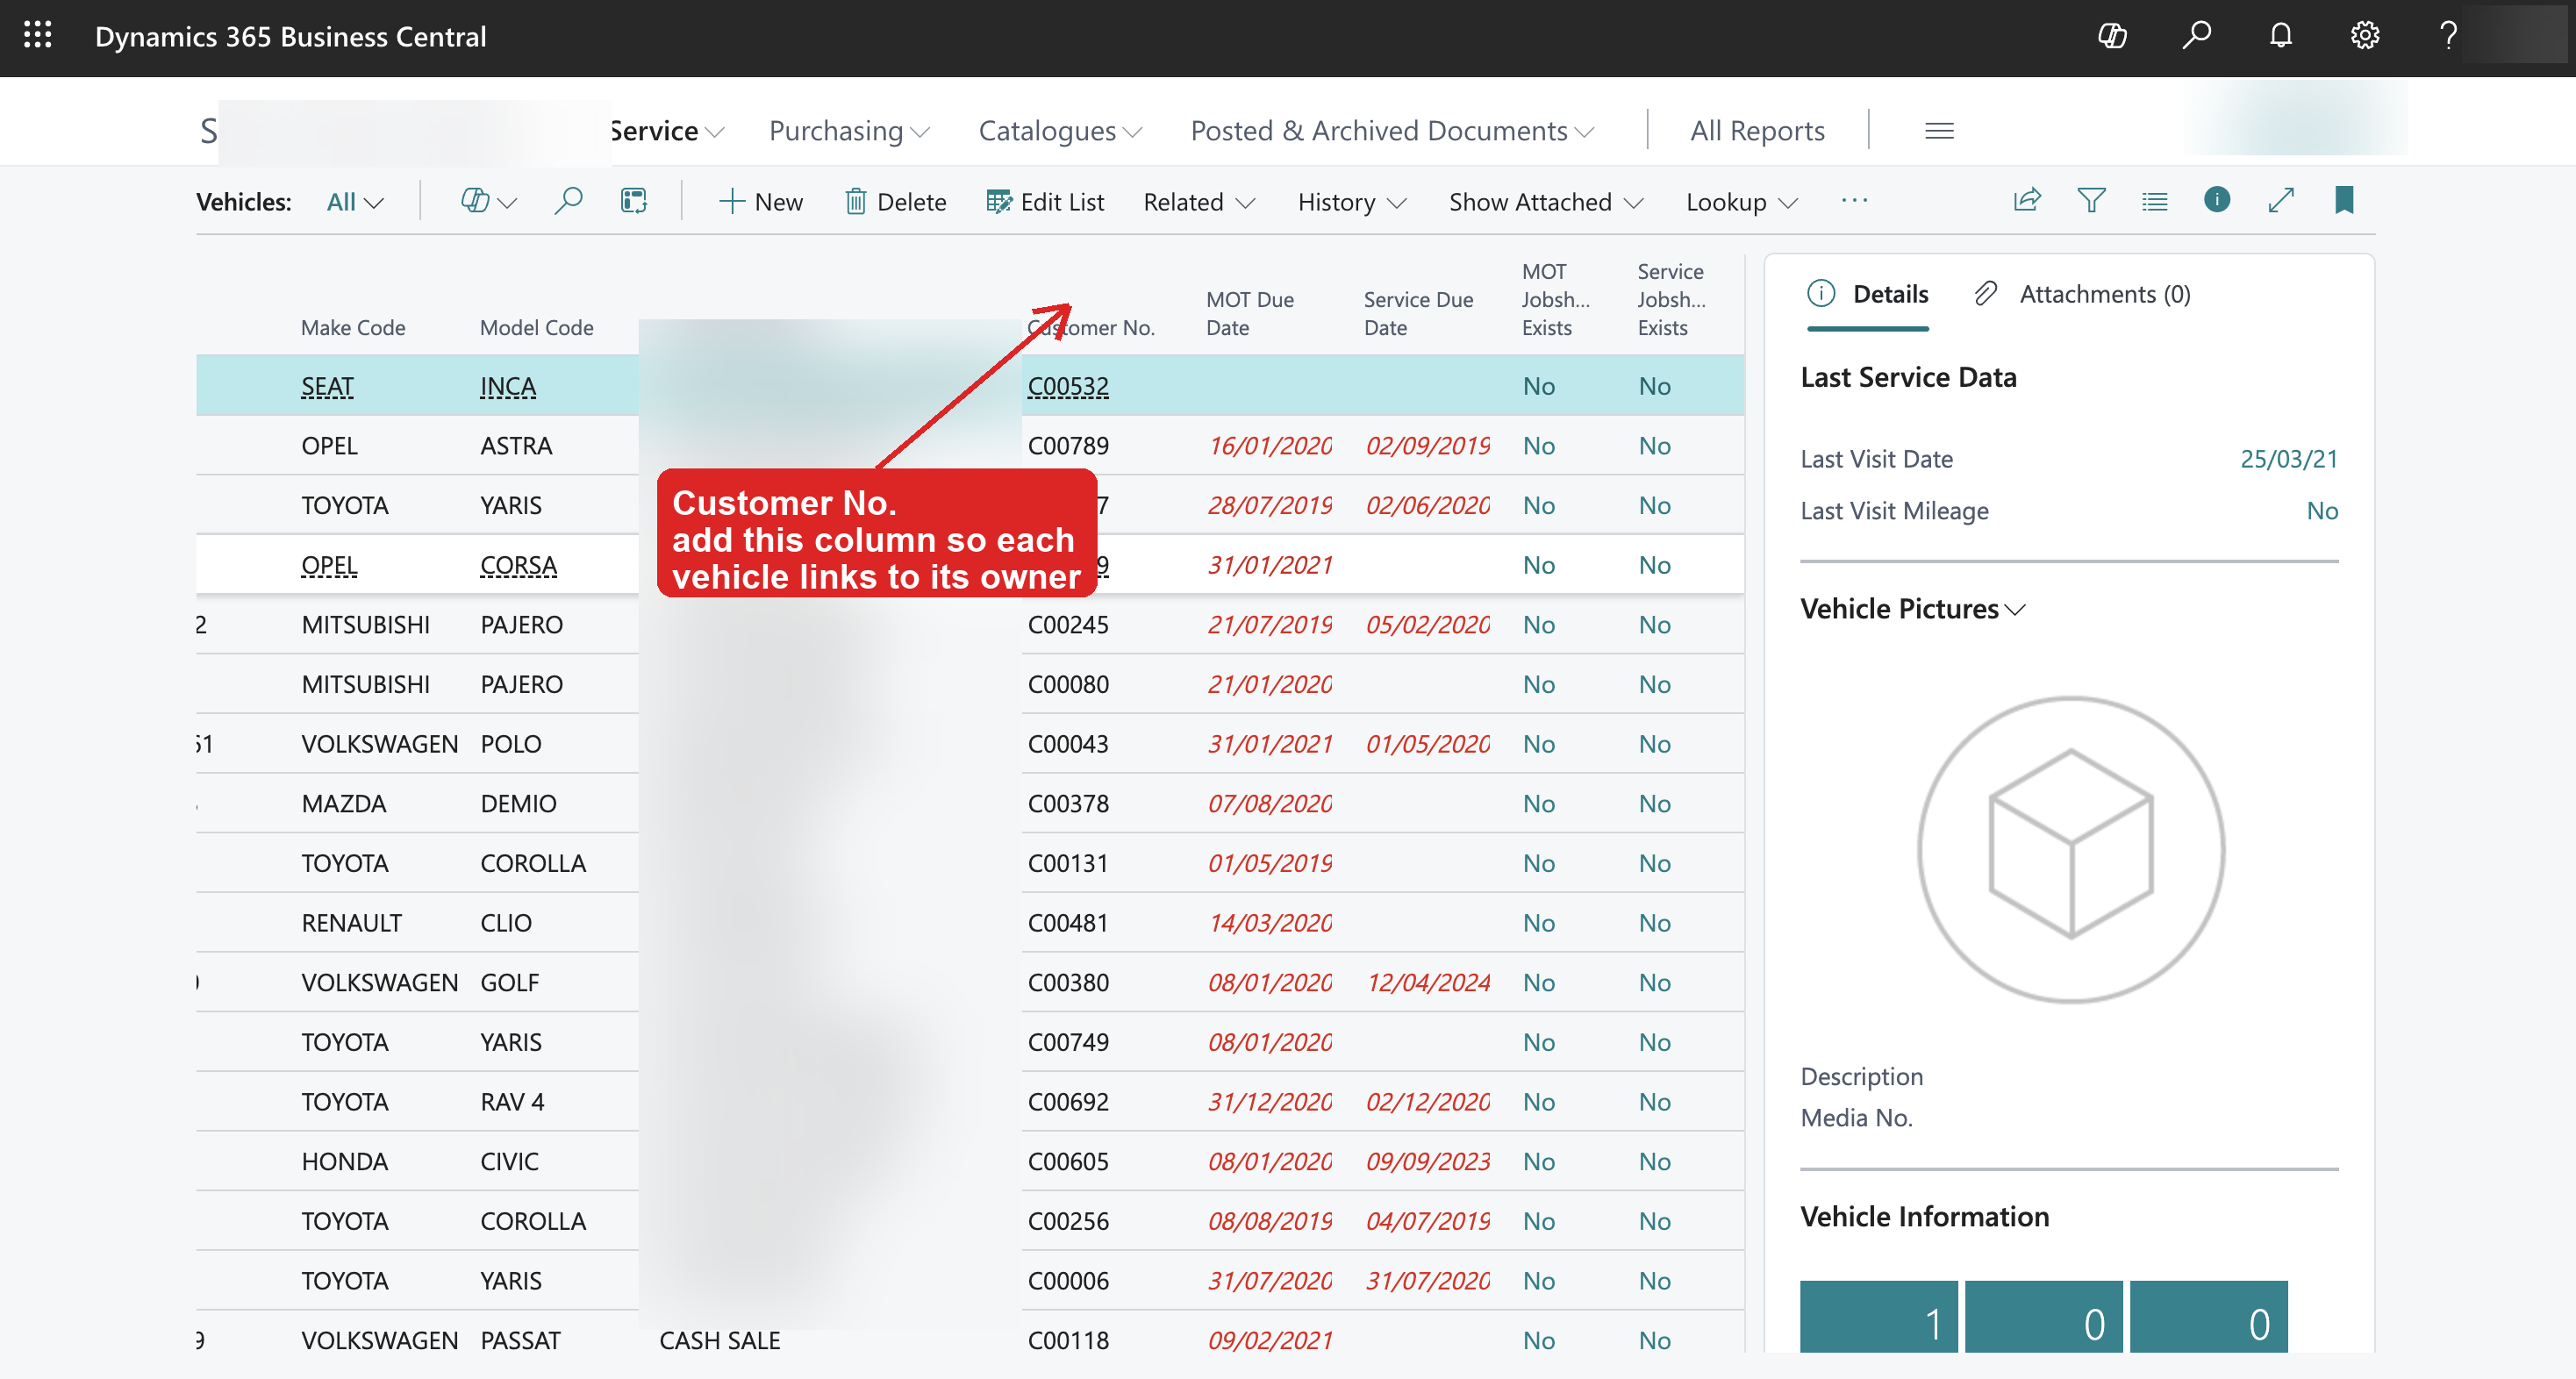
Cars that have never had a job here have no history to link them by. Without a Customer No. they still come across, but onto Unassigned vehicles (imported), and you move each one to its customer (see Data Import). To link them straight away, Personalise → + Field → drag in Customer No. before you export.
3. Posted Jobsheets
Search Posted Jobsheets, clear any date filter, Open in Excel. No column to add. This is your job history.
4. Posted Sales Invoices
Search Posted Sales Invoices (note: Posted — the plain "Sales Invoices" list only shows open drafts). Clear the date filter, then Open in Excel. No column to add — the exact service date comes from the Customer Ledger Entries file below, not from this list.
5. Posted Sales Invoice Lines
Search Posted Sales Invoice Lines → Open in Excel (no column to add). This is the big one — one row per part/labour line, and it's what builds the actual vehicle service history.
6. Customer Ledger Entries
Search Customer Ledger Entries → Open in Excel. No column to add. This file carries the open balances and the exact posting date of every invoice, which is what dates the service history. Filter Open = Yes if you only want the outstanding ones, or export it as it comes.
It also carries payments that were never applied to an invoice: money a customer paid that Garage Hive still holds on their account, shown on their Garage Hive statement as a line like Payment TCP-11108 -38.85. Each open payment (and any open credit memo) comes across as credit on that customer's account, for the amount still open, dated on its posting date and keeping its document number as the reference. You'll see it:
- on the customer's balance and their Payments, as Brought forward, and as the credit held on account when you receive a payment from them
- on their statement, listed as a Payment on account and taken off what they owe, the same way the Garage Hive statement shows it
- under Customer credit on the Customers page
You use it by applying it to an invoice, exactly like any other credit on account. It is history from Garage Hive, so it is not counted as takings (cash-up, the dashboard) and is never sent to your accounting package, because Garage Hive already put that money in your books. The preview tells you how many are coming across: N payments on account (credit) will be brought in. Payments that were fully applied in Garage Hive are skipped. Their money is already in the invoices they paid.
Imported before 12 October 2026? Open payments weren't brought across then. To pick them up, export Customer Ledger Entries again and import that file on its own (source Garage Hive). Invoices that are already in MechIQ are skipped, an open balance that's already right is left alone, an invoice you've since taken payments against in MechIQ isn't touched, and a payment that's already been brought across is never added twice. So it's safe to run more than once.
7. Jobsheets (open) → future bookings
Search Jobsheets (the open list, not Posted) → Open in Excel. These are your upcoming bookings — they land on the calendar automatically when you import.
8. Vendors (your suppliers)
Search Vendors → Open in Excel. No column to add — check Vendor No. is showing (it is by default). That number is what links the vendor codes on your parts (EURO, FIN001, …) to the supplier's real name, so import Vendors in the same batch as Items (or before it) and your parts arrive saying "Euro Car Parts" rather than a ledger code.
Optional: add Payment Terms Code first (Personalise → + Field) so suppliers arrive on their real terms — without it you set terms per supplier afterwards under Inventory & Suppliers. The supplier's Address, Address 2, City and Post Code come across too if you add them.
9. Items (your stock)
Garage Hive calls your stock Items. Search Items and open the Items list (the one marked Lists — not Catalog Items, which is the supplier catalogue).
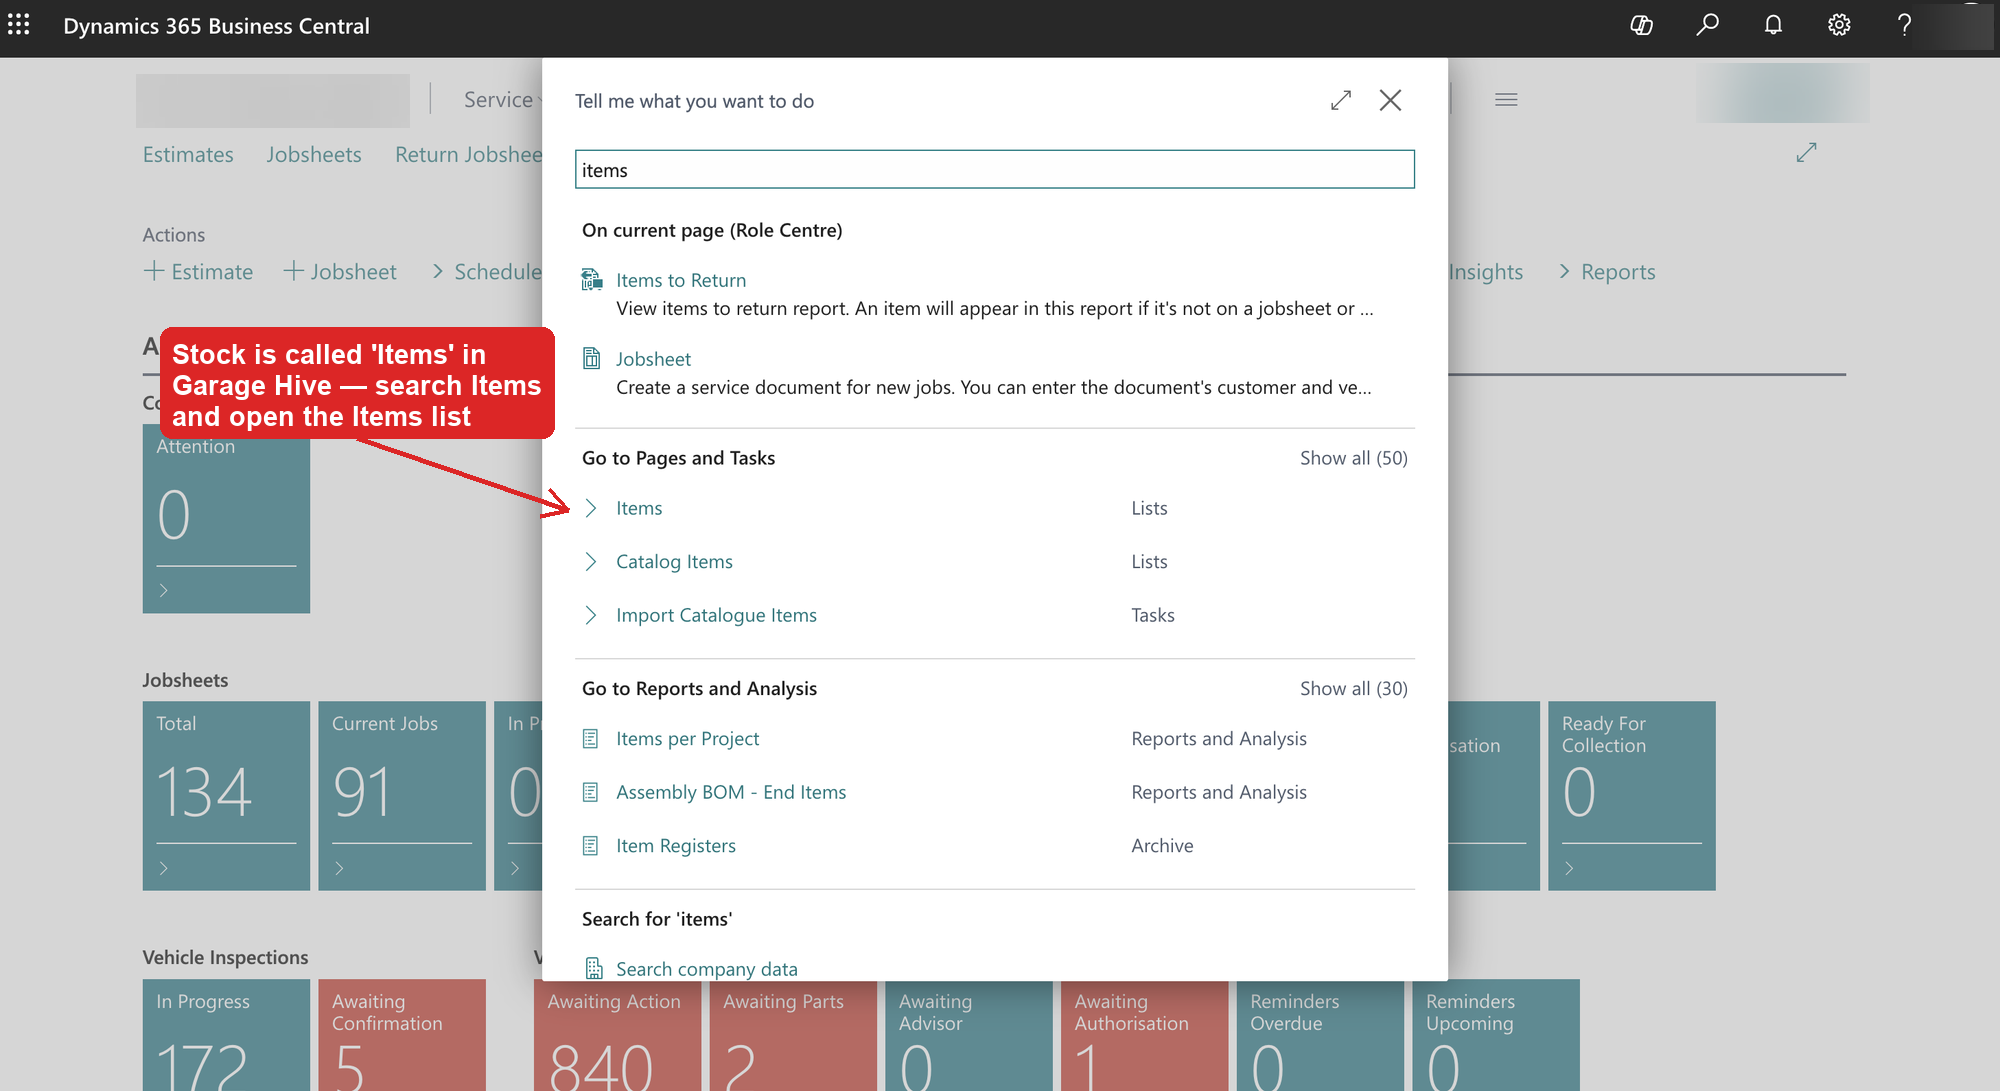
On the Items list, click the Share icon on the right of the action bar → Open in Excel. No column to add. Check the view says Items: All so nothing is filtered out.
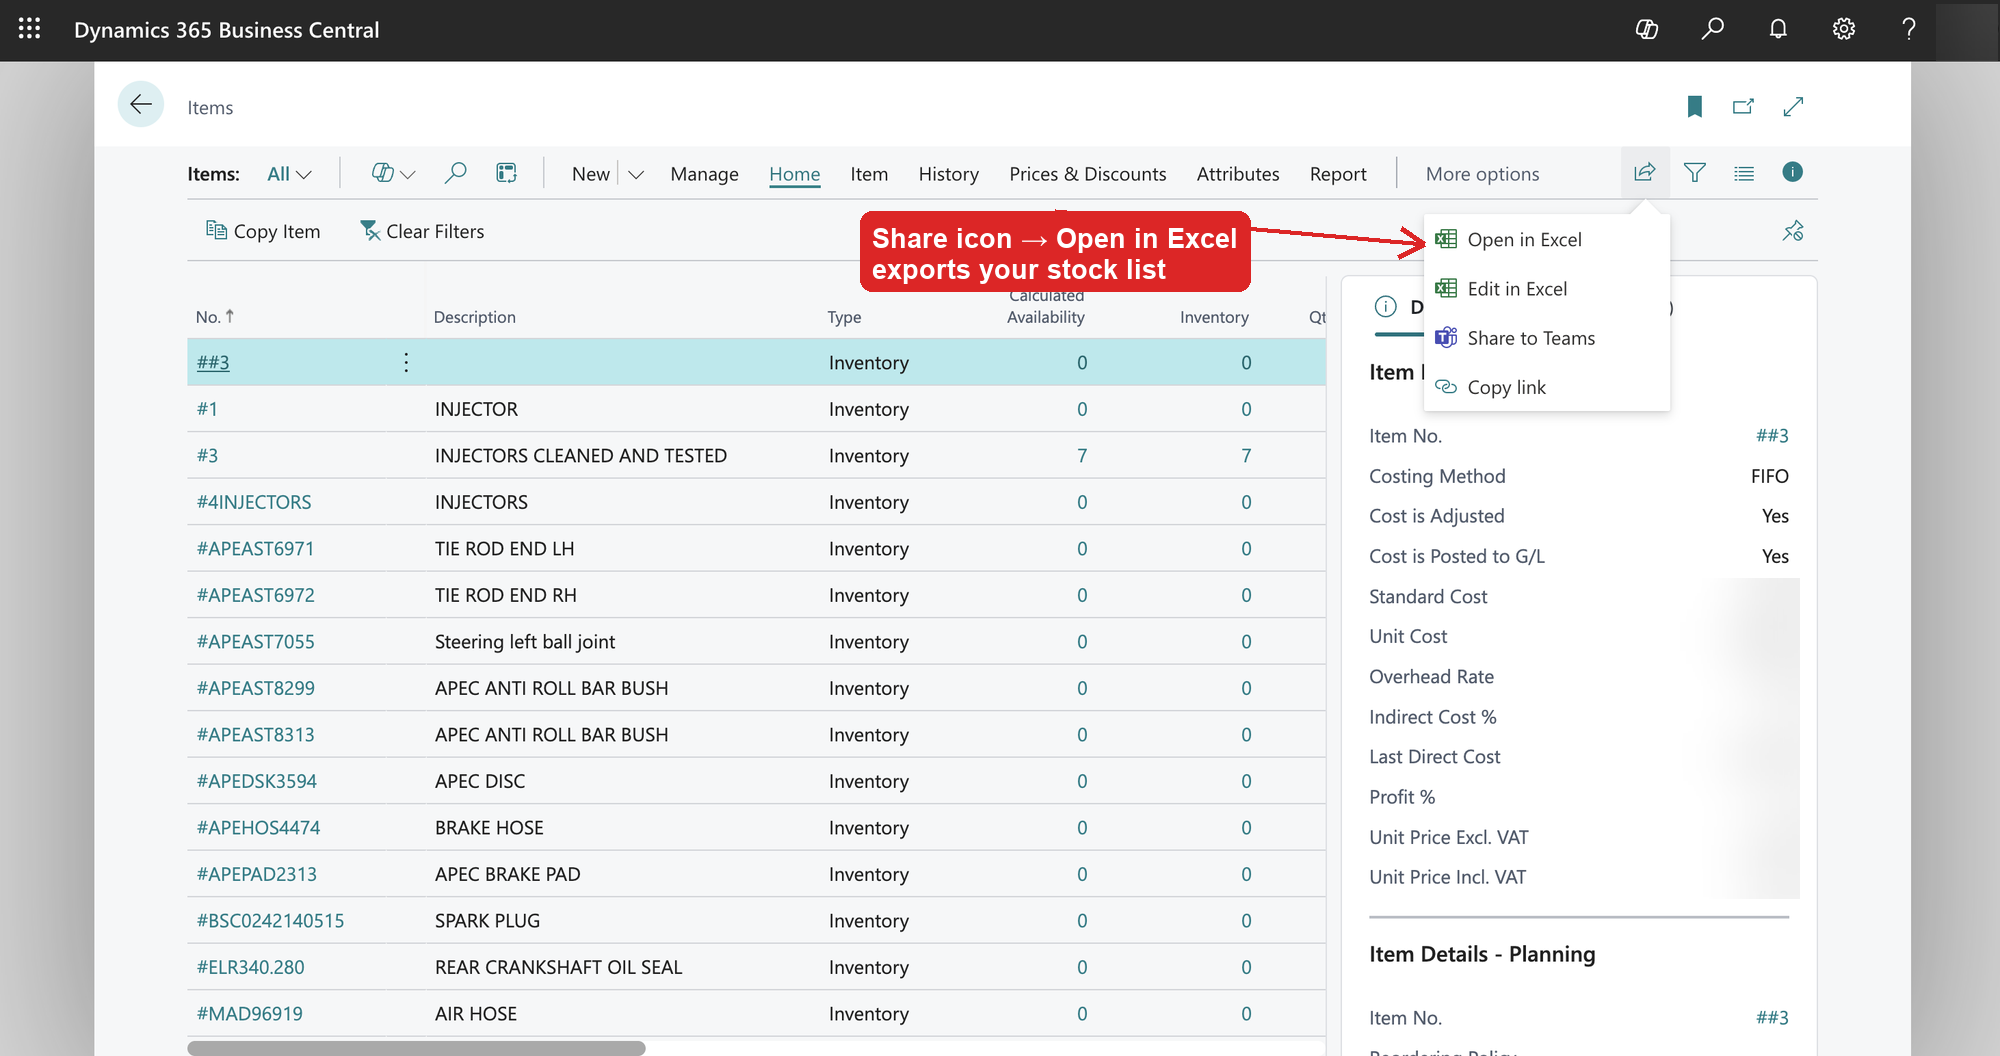
This brings your parts catalogue across with what you actually paid for each part, and the tyre sizes in it price online tyre bookings automatically.
It can take a few minutes. An Items list often holds tens of thousands of parts, and Garage Hive works out stock levels for every row before the file downloads — "Working on it…" for several minutes is normal. Wait for it.
10. Chart of Accounts (your account codes)
Only worth doing if you export to Sage, Xero or QuickBooks. Search Chart of Accounts → check the External System No. column is showing; if it isn't, add it (Personalise → + Field → External System No.), then refresh (F5) → Open in Excel.
External System No. is the nominal code your accounts package knows; Garage Hive's own No. column is internal to Garage Hive. If you export the chart without the External System No. column, MechIQ uses Garage Hive's No. as the code instead — only do that if your accountant confirms those numbers match the codes in your accounts package. Include the column and any account with it left blank is skipped. Heading and total rows are skipped automatically.
External System No. — your accounts package's references (optional, recommended for Sage)
Garage Hive's Customer and Vendor cards have a field External System No. ("Used for Accountancy System Integration"). It holds the account reference your accounts package uses for that customer or supplier — for example Sage SC000902 for Garage Hive customer C00902, or a name code such as LYN001. When MechIQ has it, every invoice, bill and payment exports under that reference, and you don't need to match your Sage lists.
You can add the column to the Customers list with Personalise and see it on screen, but Open in Excel from the list leaves this field out. Export it with a Configuration Package instead:
- Search Configuration Packages → New.
- Give it the code
SAGEREFS. - Add two tables: 18 Customer and 23 Vendor.
- For each table, open Fields, clear all the ticks, then tick only No., Name and External System No..
- Click Export to Excel.
Import that workbook in MechIQ (source Garage Hive), on its own or together with your other files. MechIQ reads the Customer sheet and the Vendor sheet and shows them as Customer account references and Supplier account references. This file creates nothing. It gives each customer and supplier that MechIQ already has (found by its Garage Hive No.) its account reference:
- A customer or supplier with no reference yet gets the one in the file.
- One that already has a different reference in MechIQ keeps it — it is never overwritten. The preview counts these, and Download these rows lists them so you can check them.
- A No. that matches no customer or supplier in MechIQ (or in the same import) is skipped and listed.
A sheet that you make yourself with the same three columns (No., Name, External System No.) works too, for example one pasted from Garage Hive.
If your export or copy of a full Customers or Vendors list already has an External System No. column, the import reads it from there as well: new customers and suppliers get their reference, and Fill in missing details adds it to ones you already have.
Purchase Lines (optional extra — your suppliers' part numbers and costs)
Search Purchase Lines → clear any date filter → check Buy-from Vendor No. and Direct Unit Cost Excl. VAT are showing (add them with Personalise if not, then F5) → Open in Excel. MechIQ recognises the file by those two columns. Each supplier's part numbers and real unit costs become supplier price-list entries, used when sourcing parts; where a part was bought more than once, the latest price is kept. Import it in the same batch as Vendors (or after it) so each line finds its supplier.
Importing into MechIQ
- Go to Settings → Data Import.
- Set "Where is this data from?" to Garage Hive — this maps your columns exactly.
- Drop all the files in together (history and the open Jobsheets). MechIQ detects what each one is, previews what it'll create, and only commits when you confirm.
The Chart of Accounts file goes in with the rest. MechIQ recognises it on the Garage Hive setting and your nominal codes land as your chart of accounts. Heading and total rows in the export are skipped -- they are not real accounts -- so expect the preview count to be lower than the row count. If the detected type on the Upload step is anything other than chart of accounts, correct it there rather than importing it as the wrong thing.
An import can be undone from the result screen for 48 hours, as long as it is your most recent import and you haven't edited the imported records or booked jobs against them. Past that, correct records individually. So if you're importing in stages, check each batch before you run the next one — starting the next import closes the door on undoing the last.
Already imported? Fill in the blanks
If your customers are already in MechIQ without their addresses (or without another column you've since added — payment terms, marketing channel, MOT due date, …), you don't need to start again. Export the list again with the missing columns and import it with Fill in missing details ticked:
- In Garage Hive, add the columns to the list (for addresses: ⚙ → Personalise → + Field →
Address,Address 2,City,Post Code), click Done, refresh (F5), then Open in Excel. - In MechIQ, go to Settings → Data Import, set the source to Garage Hive and upload the file.
- On the Preview step, tick Fill in missing details on customers, vehicles and suppliers I already have. The preview updates to show, for each list, how many records will be created, how many existing ones will get missing details (and which — address ×3,412, phone ×120 …), and how many already have everything.
- Click Import all.
What it does:
- Only empty fields are filled. A detail that's already in MechIQ — even one that differs from the file — is never changed.
- Customers are recognised by their Garage Hive No., or (for one that came across under another number) by the same name together with the same phone or email. They can get an address, phone, email, payment terms, how they found you and their account reference (
External System No.). - Vehicles are recognised by registration (or VIN) and can get a VIN, engine, colour and MOT / NCT due date. Suppliers are recognised by name and can get a phone, email, address, payment terms and their account reference.
- A phone number or email already on another customer is kept as a shared number on this one (it stays with the customer who has it, who gets the texts; searching it finds both). A VIN already on another vehicle is left blank. The preview counts these so you can see how many.
- New rows are created as normal, so a customer added in Garage Hive since your first import comes across too, and so does one an earlier import missed.
- Undo (same rules as any import: within 48 hours, most recent import only) empties the details it filled in again — except any you've changed by hand since, which are kept.
Leave the box unticked and the import behaves exactly as before: records already in MechIQ are skipped and nothing on them changes.
Customers missing after an import before 12 October 2026
Imports before 12 October 2026 treated two customers who shared a phone number or email as one person, and kept only the first. The second (a different customer with their own Garage Hive No.) didn't come across, and neither did their vehicles, jobs and invoices. Now both come across: see Two customers, one phone number in Data Import.
To bring the missing ones in, import the same files again with Fill in missing details ticked, in this order: Customers, then Vehicle List, then Posted Jobsheets, Posted Sales Invoices and Posted Sales Invoice Lines, then Customer Ledger Entries. Everything already in MechIQ is recognised by its Garage Hive number and skipped (or has its blanks filled), so only the missing customers and their history are created. Nothing is duplicated, including the lines of jobs that already have them. An imported invoice that sits on a different customer than its Customer No. names is moved to the right one (the preview tells you how many), unless payments have been taken against it in MechIQ. Undo moves it back.
Vehicles skipped as "no owner found" before 12 October 2026
Imports before 12 October 2026 skipped every vehicle whose Customer No. was blank or wasn't in your customers file. They now come across on Unassigned vehicles (imported) (see Data Import). To bring them in, import the Vehicle List again, with Posted Jobsheets, Posted Sales Invoices, Posted Sales Invoice Lines and Customer Ledger Entries, and tick Fill in missing details. Vehicles already in MechIQ are recognised by registration and skipped. Only the missing ones are created, together with any history that names them, and nothing is duplicated. The preview says how many go to Unassigned vehicles first. Then move each car to its customer from there.
A note for Sage users: match your Sage account references after the import
If Garage Hive already fed your Sage, your customers and suppliers are already in Sage, under the account references your accountant uses. MechIQ must use those same references, or your first export would post invoices to new (or wrong) accounts.
First choice: bring the references from Garage Hive. If Garage Hive has External System No. filled in on your customers and suppliers, import it (see External System No. — your accounts package's references above). Those customers and suppliers then export under their real references straight away, and they are never held back. Match your Sage lists only for what Garage Hive doesn't have a reference for — the steps below. Often the Sage reference follows the Garage Hive number — Garage Hive customer C00902 is Sage SC000902, supplier V00085 is SV000085, sometimes with the numbers shifted for a range — while customers that came into Garage Hive from an older system have name codes in Sage (MCG001, MUR003). MechIQ matches on the name and learns the numbering from your list.
When Garage Hive has no reference for them, before your first export:
- In Sage 50, export your customer list and your supplier list (Customers → select all → Export, or Reports → Customer List / Supplier List → to Excel). CSV or Excel both work; Sage's own column names are fine.
- In MechIQ, go to Settings → Accounting → Match to my Sage accounts and upload each list.
- Review the result. MechIQ is sure when the name and the Sage number agree, and matches the older name-code accounts by name (and phone where Sage has it). Anything it can't be sure of — the name and the number pointing at different customers, or two customers with the same name — is listed for you to pick. Nothing there is applied unless you choose it.
- Click Apply Sage references. Every matched customer and supplier now exports under its Sage reference. One that isn't on your Sage list isn't in Sage yet: the first time it's exported it gets the next number in your Sage series (for example
SC004189) and its record goes to Sage with it. Any you left unpicked in the review are held back from exports until you pick them.
See Accounting settings for the details.
After the import: keep sending email from your address
Garage Hive sends customer email through your garage's own mailbox (its Email Accounts page). MechIQ can do exactly the same — copy the same SMTP values across so emails keep coming from your address after the switch. See Send Emails Through Your Own Email Account for the step-by-step (including where to find the values in Garage Hive).
If Garage Hive won't give you a column or list
Because you're migrating off, Garage Hive (or your Business Central reseller) can usually provide a complete data export on request — worth asking in parallel if the Personalise step is fiddly or a list looks incomplete.